Creating a bronze statue isn't just about pouring hot metal; it's a journey that transforms an artist's vision into a timeless masterpiece. The entire process hinges on a method perfected over thousands of years called lost-wax casting. It all begins with a simple clay model, which is then painstakingly used to create a series of molds before a single drop of molten bronze is ever poured.
The Art of Turning Clay Into Bronze
Welcome to the fascinating world where ancient craft meets modern skill. This guide will walk you through exactly how a bronze statue is made, from a rough idea to a finished work of art. We’ll break down the entire process, focusing on the celebrated lost-wax casting method—a technique that has been refined for millennia.
You'll see how a sculpture starts as a simple clay model, moves through the critical stages of mold-making, withstands the intense heat of molten metal, and is finally brought to life with meticulous finishing. It’s a delicate dance between artistry and technical precision, where every step is crucial for the final outcome.
An Ancient Technique for Modern Masterpieces
The go-to method for creating bronze statues is the ancient technique of lost-wax casting. This process, with roots stretching back to around 4500 BCE, is still the foundation of modern bronze sculpture. It all starts with the sculptor creating a detailed clay model. Clay offers incredible flexibility, allowing for intricate details that are much harder to achieve when carving something like stone.
Once the artist is satisfied with the clay model, a rubber silicone mold is carefully formed around it to capture every last nuance. You can dive deeper into this foundational process and its rich history at The Bronze Man's guide to custom statues.
Understanding this core technique is key, as it explains why bronze is such a revered medium. It allows for a level of detail and complexity that few other materials can match.
Bronze’s unique ability to capture fine detail and withstand the test of time connects today’s creations to a rich historical legacy. From monumental public works to delicate personal commissions, this metal offers both beauty and permanence.
Why This Process Endures
There’s a reason the lost-wax method has been the gold standard for centuries. It's simply unparalleled at replicating complex shapes and subtle textures, ensuring the artist's original vision is faithfully translated into the final metal form.
To help you visualize the journey, here's a quick look at the main stages involved in bronze casting.
Overview of the Bronze Casting Process
This table summarizes the key milestones in transforming a concept into a finished bronze statue.
| Stage | Primary Goal | Key Materials |
|---|---|---|
| Initial Modeling | To create the original sculpture and define its form and texture. | Oil-based clay, sculpting tools, armature |
| Mold Creation | To capture the exact details of the clay model for replication. | Silicone rubber, plaster, fiberglass |
| Casting | To pour molten bronze into the final mold to create the raw statue. | Wax, ceramic shell, molten bronze |
| Finishing | To clean, assemble, and apply the final patina to the raw bronze. | Welding tools, grinders, chemical patinas |
Each of these stages requires a unique set of skills and materials, building upon the previous one to achieve the final, stunning result.
Here’s a quick breakdown of what happens in each phase:
- Initial Modeling: This is where it all begins. The artist's vision first takes physical shape in clay.
- Mold Creation: A series of molds, starting with a flexible inner one and a rigid outer shell, are made from the original model.
- Casting: Molten bronze is poured into a final ceramic mold, replacing a wax replica that has been melted away—hence the name "lost-wax."
- Finishing: The raw bronze is chased, welded, polished, and treated with a patina to achieve its final color and texture.
Crafting the Original Sculpture and Master Mold
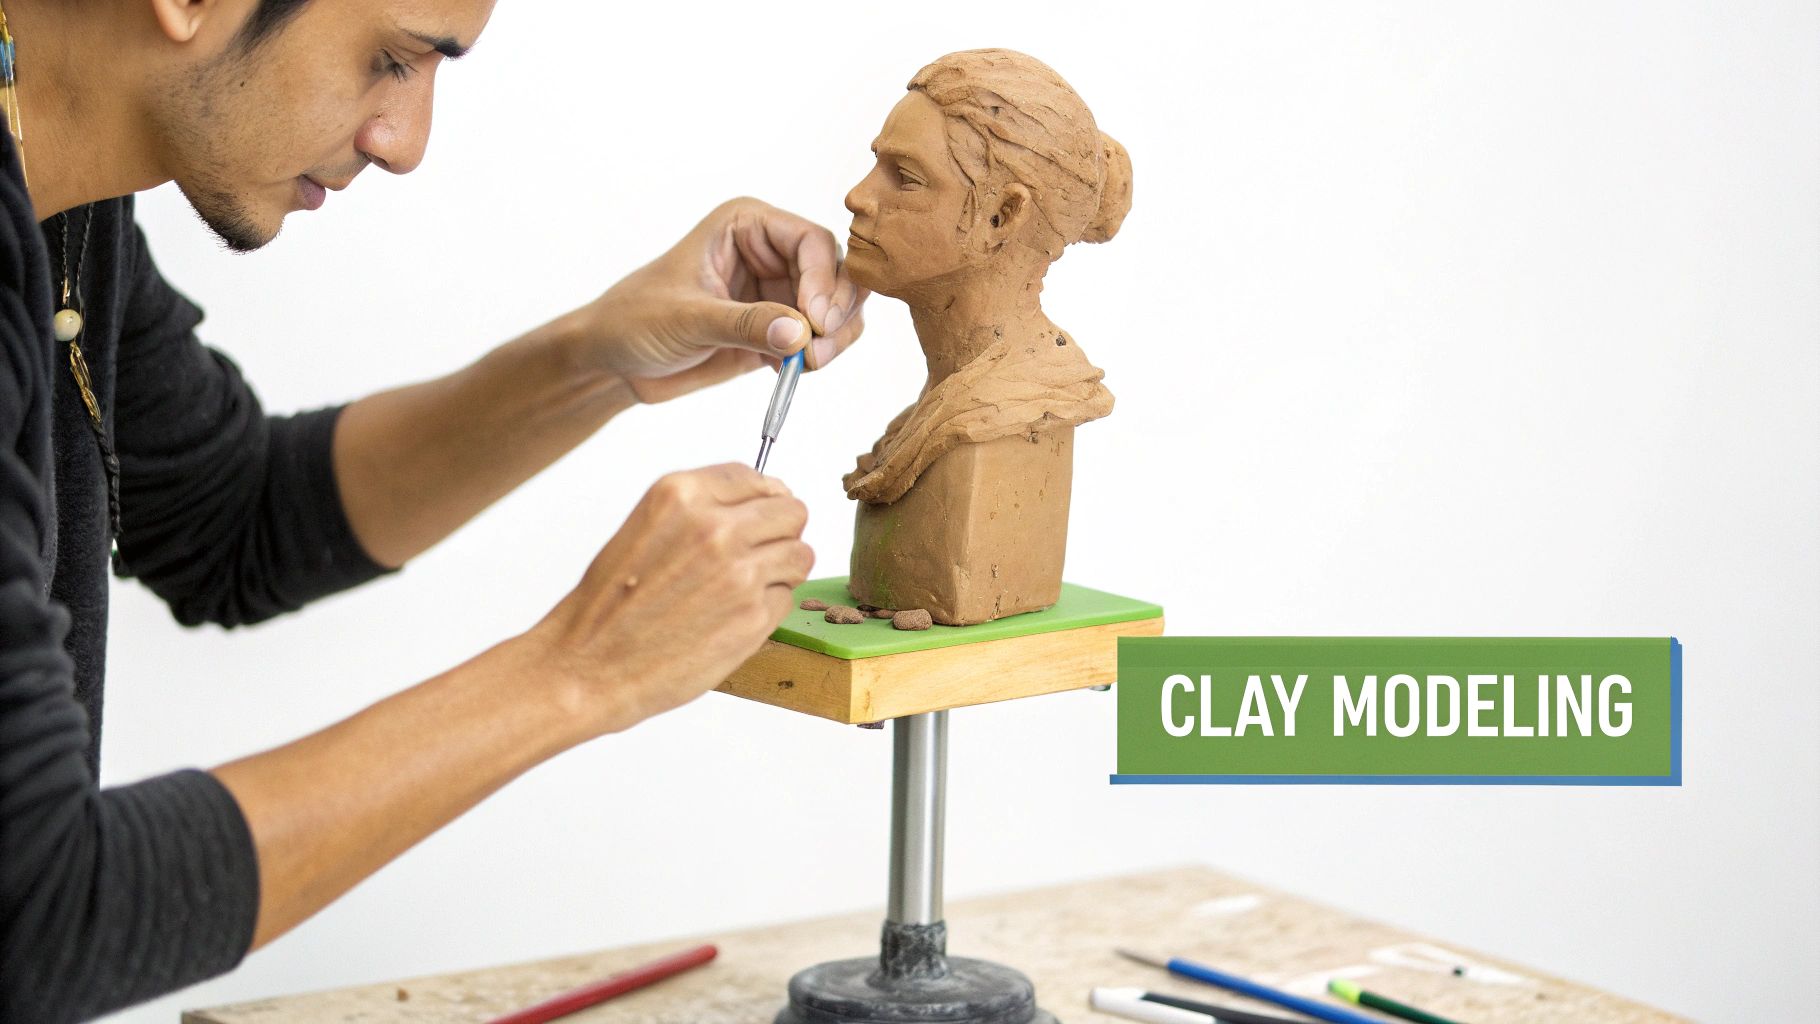
Every bronze statue, no matter how grand, starts its life not as metal, but as something much softer. The whole journey from an idea to a lasting work of art begins with the artist's hands shaping an original sculpture. This is where the piece gets its soul.
Most artists reach for a forgiving medium like oil-based clay or plasticine. Unlike water-based clays that dry out and crack, these stay pliable almost indefinitely. That's a huge plus, giving the sculptor the time they need to get every detail just right—from the delicate curve of a smile to the way fabric drapes.
But you can't just start with a lump of clay. The first thing an artist builds is an armature, which is essentially a metal wire or wood skeleton for the sculpture. This internal framework is what holds up the weight of the clay, especially for larger works or pieces with dramatic poses like an outstretched arm. Without it, the sculpture would just collapse on itself.
Sculpting the Vision into Reality
Once the armature is ready, the real work begins. The artist starts applying and shaping the clay, slowly bringing their vision to life. Using a collection of classic tools—wire loops, small knives, and wooden instruments—they add, remove, and smooth the material.
Before jumping in, it’s smart to make sure you have the right gear. A good list of essential art supplies for beginners can be a lifesaver if you're just starting out.
This is a painstaking, hands-on process. A life-sized statue can easily take weeks, if not months, to complete. Every single texture and surface detail has to be perfected in the clay, because the molds we'll make next will pick up everything with incredible accuracy.
Creating the Negative Mold
When the artist finally declares the clay original "finished," it's time to create the master mold. The goal is to make a perfect negative copy of the sculpture. This is a delicate operation where precision is key to capturing every detail without harming the original artwork.
We start by brushing on a layer of liquid silicone rubber directly onto the clay. This stuff is amazing—it seeps into every tiny crevice and undercut. We apply several coats, sometimes adding a thickening agent to build up a tough but flexible skin that can be peeled away without tearing.
That first silicone layer is probably the most crucial part of the entire mold-making process. Its flexibility is what lets us reproduce complex shapes and undercuts—areas where the form curves back in on itself—which would be impossible with a rigid mold.
The Supportive Mother Mold
The silicone rubber is fantastic for detail, but it's floppy. It can't hold its shape on its own. That's where the mother mold comes in. This is a rigid outer shell, usually made of plaster or fiberglass, built right over the silicone.
We create the mother mold in sections, almost like a 3D puzzle. We'll often build a thin clay wall (called a shim) to divide the sculpture, then apply plaster to one side. Once that sets, we remove the shim, apply a release agent to the new plaster edge, and create the other half.
This sectional design is what allows us to take the mother mold apart and put it back together perfectly. It cradles the delicate silicone mold, holding it in just the right position for the next steps. Once the mother mold is done, we carefully take it apart, peel the silicone layer off the original clay sculpture, and put it all back together.
What we're left with is a perfect negative mold, ready for the next stage of its transformation: from clay to wax, and finally, to bronze.
Building the Wax Replica and Ceramic Shell
Now that we have a perfect master mold, the focus shifts from capturing the artist's vision to flawlessly replicating it. This next part of the journey is all about creating a hollow wax copy of the original sculpture—this isn't just a stand-in; it's the precise pattern that will soon be transformed into bronze.
It all starts with molten wax, heated to around 93°C (200°F), which is carefully poured into the assembled silicone and plaster mold. To make sure the final statue is hollow (a must for managing weight and ensuring structural stability), the wax isn't just left to pool. Foundry artisans use a technique called "slushing," where they meticulously rotate and swirl the mold to coat the entire interior surface.
Layer by careful layer, the wax builds up to the target thickness, usually between 3/16 and 1/4 of an inch. Getting this uniform is absolutely essential. A thin spot could easily become a weak point or even a hole in the final bronze casting.
Refining the Wax Pattern
Once the wax has had a chance to cool and fully harden, the mother mold is disassembled. The flexible silicone layer is then gently peeled back, revealing a warm, amber-colored twin of the original clay sculpture, complete with every last detail.
But it’s not quite ready yet. The molding process always leaves behind subtle imperfections, like the faint seam lines where the two halves of the mold met. This is where a painstaking hand-finishing process known as wax chasing comes into play.
Using an array of heated metal tools and delicate sculpting instruments, artisans meticulously smooth away the seam lines, patch any tiny air bubbles, and resharpen any details that may have softened. It’s a job that requires incredible skill and patience, bringing the wax replica back to the artist's original standard.
The quality of the wax chasing directly impacts the final bronze. Every tiny detail corrected at this stage means less difficult and time-consuming metalwork later on. It’s a classic case of "measure twice, cut once."
Engineering the Flow of Bronze
Before the wax pattern can be coated, it needs a plumbing system—for molten metal. This network of wax rods, called a gating system, is a brilliant piece of engineering with a few key parts:
- Sprues: These are the main "highways" that will guide the molten bronze from the pouring cup down into the mold.
- Gates: Think of these as the smaller "off-ramps" that branch off the sprues and connect directly to the wax statue itself.
- Vents: These are the all-important escape routes. As thousands of degrees of bronze rushes in, it displaces air and creates hot gases that need to get out fast. Without proper venting, you end up with trapped air bubbles or an incomplete pour.
For a complex piece, like a figure with an outstretched arm, figuring out the placement of these sprues and vents is a precise science. The goal is to ensure the liquid bronze can reach every single nook and cranny while giving those hot gases a clear path out.
Creating the Ceramic Shell
With the gating system fully attached, the wax figure now looks more like a strange, intricate tree. It's finally ready for its heat-resistant armor. This is built up through a methodical process of dipping and coating.
The entire wax assembly is first submerged in a vat of ceramic slurry—a liquid mixture with the consistency of fine, gritty paint. Immediately after being pulled from the slurry, it's coated in fine silica sand. This initial layer is the most important, as it’s the one that captures the finest surface details.
This dip-and-coat cycle is repeated again and again, sometimes up to a dozen times. With each new layer, the slurry and sand become progressively coarser, building up strength. Every single coat has to dry completely before the next one is applied. This patient layering creates a thick, robust ceramic shell, strong enough to handle the incredible heat and pressure of the bronze pour.
From Wax to Bronze: The Trial by Fire
Now we move from the quiet precision of mold-making to the raw, elemental power of the foundry. This is where the magic really happens. That ceramic-coated wax figure, which now looks like a piece of abstract art, is about to undergo its fiery transformation. We call this stage the burnout, and it's the heart of the "lost-wax" casting process.
We take the entire ceramic shell and place it upside down in a specialized oven known as a kiln. The heat is cranked up slowly but surely, eventually hitting a staggering 870°C (1,600°F)—sometimes even hotter. This intense heat does two things at once.
First, as the name suggests, it melts out every last bit of the wax model and the gating system. The wax flows out, leaving a perfectly hollow cavity inside the shell, an exact negative impression of the original sculpture. At the same time, that same heat fires the ceramic, hardening it into a super-strong, rock-solid mold that can handle what's coming next.
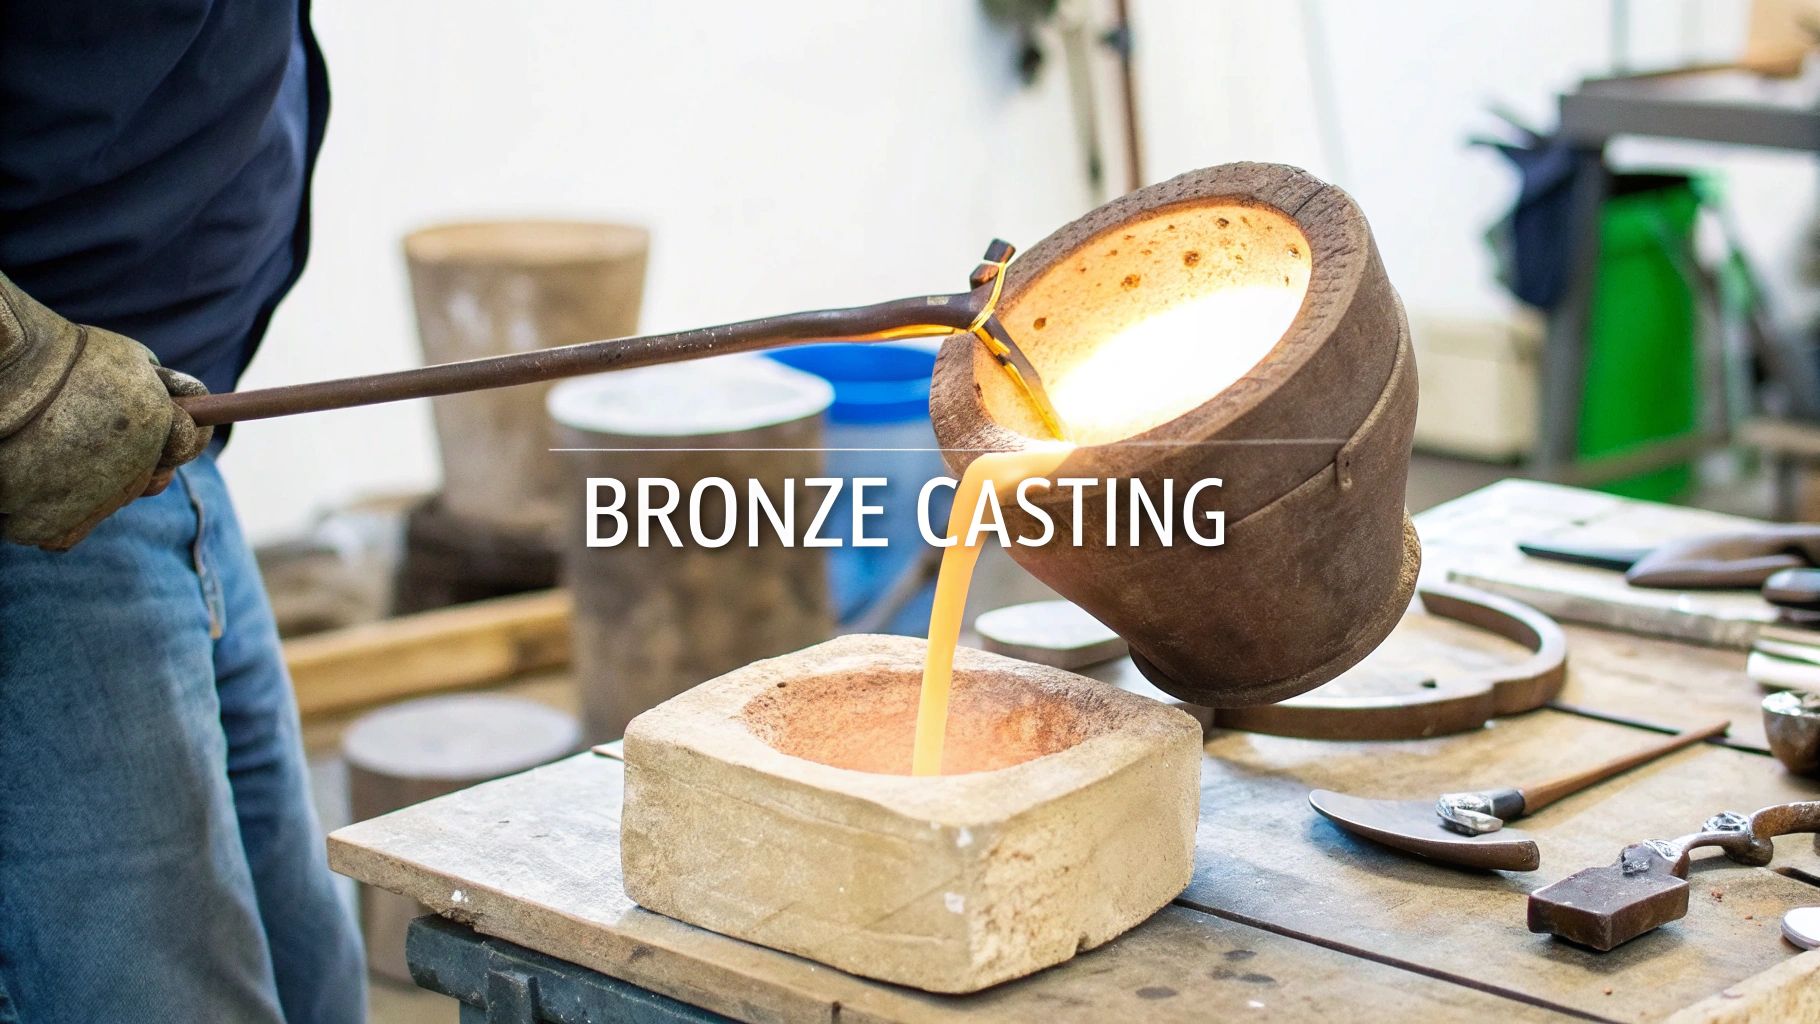
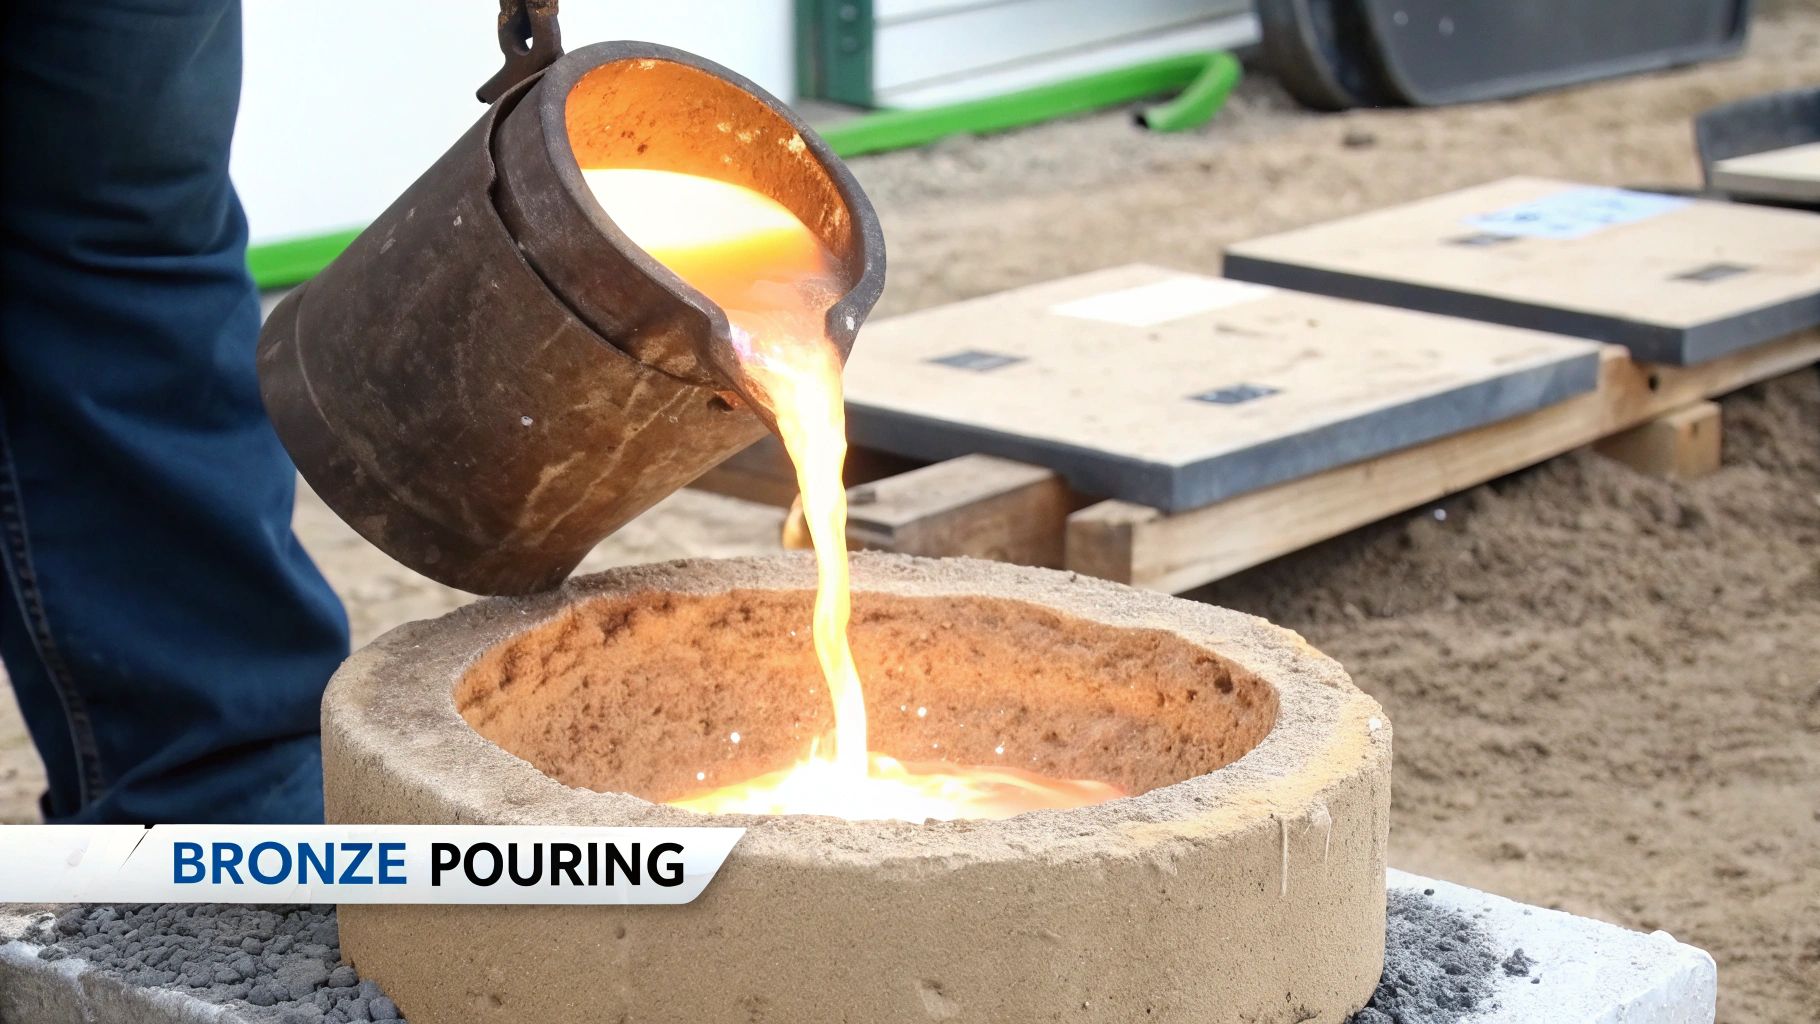
The Crucible and the Pour
As the burnout finishes, the foundry floor kicks into high gear. We start by loading bronze ingots—a classic alloy of copper and about 12% tin—into a crucible, which is basically a heavy-duty ceramic pot designed for extreme temperatures. That crucible goes into a furnace that will blast it with heat until it reaches a searing 1,100°C (2,000°F).
Watching solid metal turn into a glowing, liquid pool is something else. Once the bronze is molten and the ceramic shells are fully baked, it’s time for the pour. This part is a bit like a dangerous, choreographed dance. The shells come out of the kiln, still glowing hot, and we often bury them in sandpits to keep them steady.
Timing is everything here. You have to pour the bronze while the ceramic shell is still hot. If the shell is too cool, the molten metal will chill too fast on contact, which can cause cracks or leave parts of the sculpture unfilled. This is where a foundry team’s experience really shows.
Decked out in full protective gear, the team lifts the crucible of liquid bronze from the furnace. It's an incredible sight. They move with practiced calm, steadily pouring the fiery liquid metal into the hollow shells through the cup where the main wax sprue used to be.
The pour has to be smooth and continuous. You need a confident hand to ensure the bronze fills every nook and cranny, from the delicate details of a face to the subtle folds of clothing, pushing all the air out through the vents. It’s a moment that demands pure teamwork and focus.
The Cool Down
Once the molds are full, they’re set aside to cool. You can't rush this part. It can take several hours, sometimes even overnight, for the bronze to fully solidify and cool down to a safe temperature.
As the metal cools, it shrinks just a tiny bit, pulling away from the inside of the ceramic mold. This is actually a good thing—it makes breaking the shell off in the next step just a little easier. Hidden inside that rough ceramic exterior is a brand new bronze sculpture, ready to be revealed. The journey from fragile wax to permanent metal is complete.
Revealing and Refining the Final Sculpture
After the intense heat of the pour and the long, patient cool-down, you might think the hard work is over. But it's really just beginning. Hiding inside that rough, sand-colored ceramic shell is a newborn bronze sculpture, but it's still raw and unfinished. This next stage is all about meticulous refinement, where brute force makes way for true artistry to reveal the form beneath.
The first step is a process called devesting. With hammers, chisels, and sometimes pneumatic tools, foundry workers carefully break away the hardened ceramic shell. It's a dramatic moment, a lot like an archeological dig, as the bronze finally sees the light of day. The shell shatters, freeing the statue from its temporary prison.
From Raw Casting to Refined Form
What emerges is recognizable, but it's far from perfect. The sculpture is still covered in the now-bronze network of sprues, gates, and vents that were crucial for a successful pour. These metal branches have to be painstakingly cut away from the main body using saws and cutting torches.
This process leaves behind rough stubs and weld points that interrupt the surface. This is where the real artistry comes back into play with a technique called metal chasing. It’s this critical hand-finishing work that bridges the gap between a simple raw casting and a piece of fine art.
Skilled artisans, known as "chasers," use an arsenal of specialized tools to meticulously clean up every inch of the surface. Their toolkit often includes:
- Grinders and Sanders: To knock down the larger remnants of the gating system.
- Files and Rasps: For more detailed shaping and smoothing out contours.
- Pneumatic Chisels: To redefine crisp lines and textures that might have softened during the casting.
The goal here is to make every weld line and repair vanish. A master chaser can erase any minor imperfection, like tiny pits from air bubbles, making the surface completely flawless and true to the artist's original clay model. It’s a job that truly requires a sculptor's eye and a metalworker's hand.
Creating the Perfect Canvas
Once the chasing is done, the entire sculpture gets sandblasted. This involves shooting fine sand at high pressure against the surface, and it serves two vital purposes. First, it scours away any last bits of the ceramic shell that might be clinging on in tight crevices.
More importantly, sandblasting creates a clean, uniform, and slightly matte texture across the whole piece. This unifies the surface, erasing any subtle visual differences between the chased areas and the original cast surface. This sandblasted finish is the perfect, receptive canvas for the final, transformative step: patination.
The quality of the metal finishing directly determines the final quality of the sculpture. You can't hide a poor chasing job, not even with the most beautiful patina. This stage is where the integrity of the artwork is truly honored.
This incredible attention to detail extends to every part of the sculpture, including the base. This is often where foundry marks or the artist's signature are added. If you're curious about these important symbols, you can learn more about how to identify https://www.curio.app/blog/bronze-foundry-marks in our detailed guide. For adding other fine details or inscriptions, modern techniques like laser engraving metal offer incredible precision, complementing the traditional finishing work.
At the end of all this, the bronze statue stands complete in its final form, but it’s not quite finished. It gleams with the raw, natural color of bronze—a brilliant, almost golden hue. It is now a perfectly formed but blank slate, ready for the final artistic touch that will truly bring it to life.
The Art of Patination: Bringing Color to Bronze
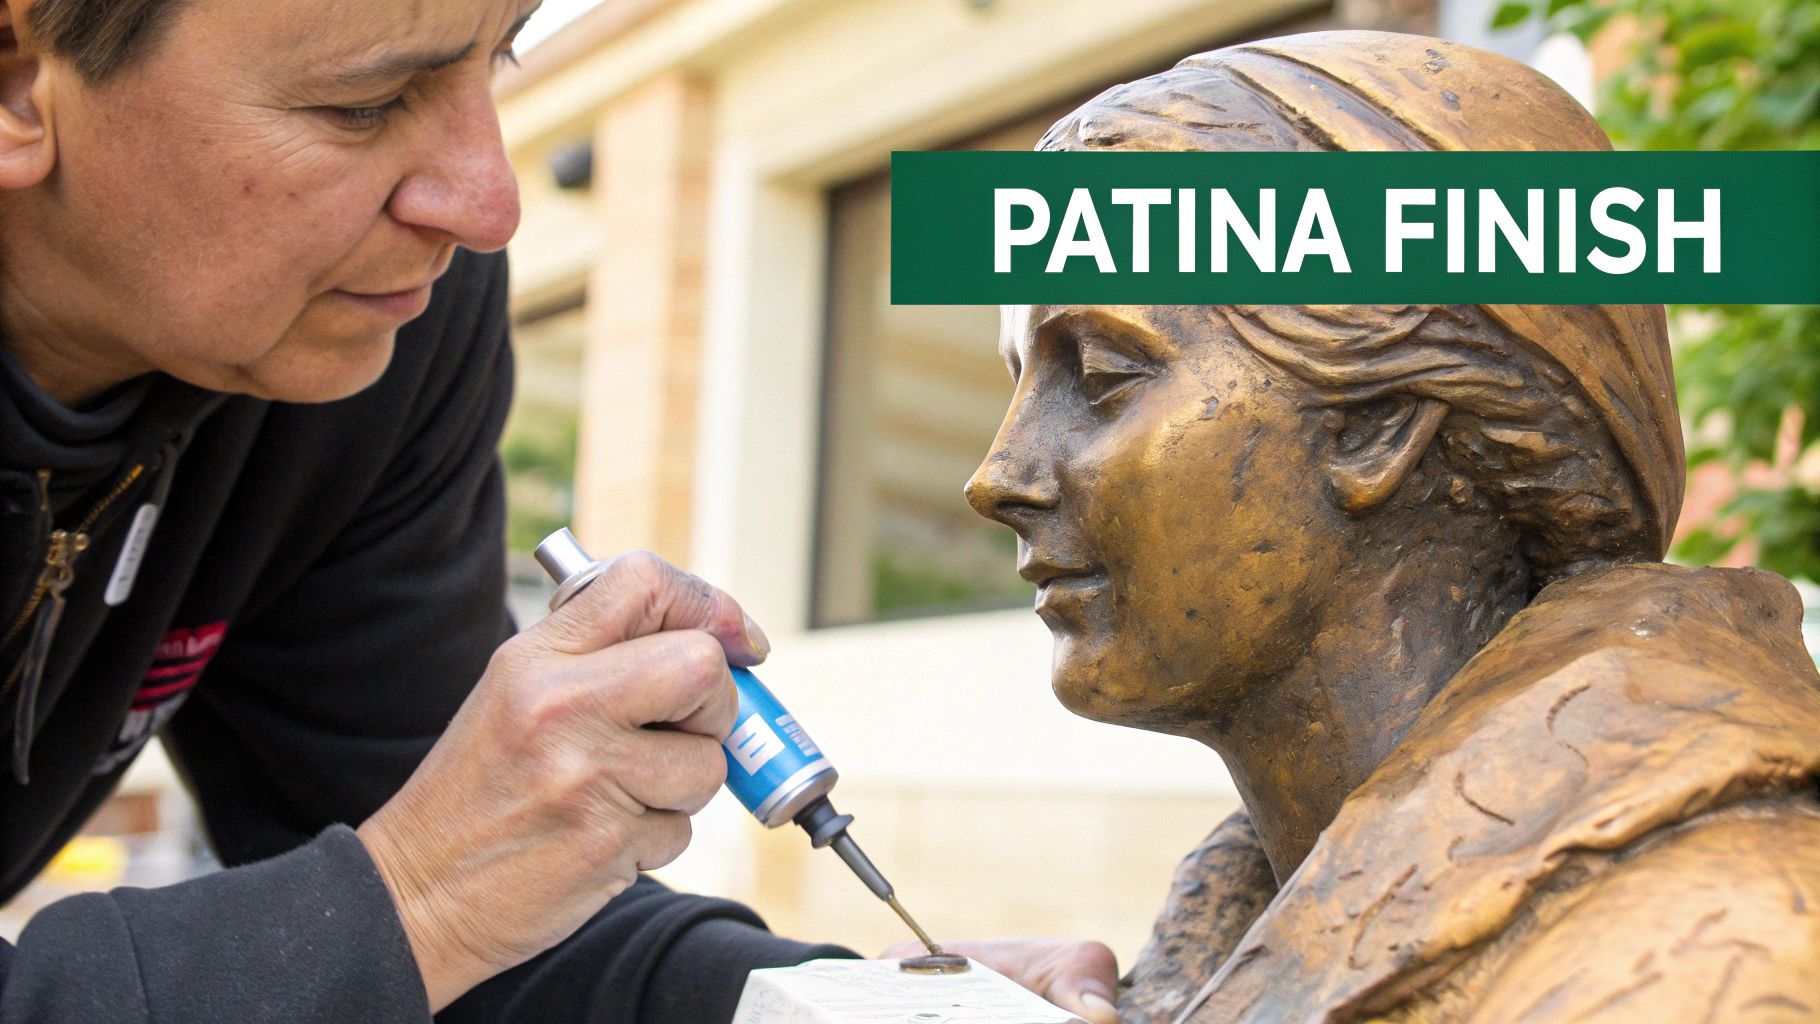
After all the grinding, chasing, and sandblasting, the statue finally stands complete. But it’s not the familiar green or brown we associate with bronze—it’s a brilliant, almost raw gold color. The piece is finished, but its soul hasn't been revealed yet. That happens in the final, magical stage: patination.
This isn't just slapping on a coat of paint. Patination is a masterful blend of chemistry and art. The artisan, known as a patineur, uses specific chemical compounds on the heated bronze surface to trigger a controlled oxidation. This carefully managed reaction is what coaxes out the rich, complex colors that give a sculpture its character and depth.
Think of the patineur as a painter, but their canvas is metal and their pigments are reactive chemicals. Their work gives the statue its stunning finish while also creating a tough, protective layer that shields the bronze from the unpredictable whims of the environment.
A Palette of Fire and Chemicals
At its heart, patination is a way of fast-forwarding time. Instead of waiting decades for nature to work its slow magic, the patineur uses a combination of heat and chemicals to achieve a mature, beautiful finish in a matter of hours.
The main tool for the job is a propane or acetylene torch. The artist carefully heats sections of the bronze to a precise temperature, usually around 93°C (200°F). This heat opens up the pores of the metal, making it receptive to the chemical solutions that are then brushed, sprayed, or stippled onto the surface. The temperature is everything; a slight variation can completely change the color a chemical produces, making the process a dynamic and intuitive dance.
A common misconception is that a patina is just a surface coating. In reality, it's a chemical conversion of the bronze itself. This is why a professionally applied patina is so durable—it becomes an integral part of the metal, not just a layer sitting on top of it.
The Chemistry of Color
The spectrum of colors a patineur can achieve is staggering, and every shade comes from a different chemical recipe. Watching it happen is like seeing chemistry come to life, as various compounds react with the copper in the bronze to create entirely new colors right before your eyes.
The traditional colors you see on public statues—deep browns, classic greens, and rich blacks—are made with time-tested chemicals. But contemporary artists have pushed the boundaries, expanding the palette to include striking blues, vibrant reds, and even stark whites.
The real artistry, however, is in the layering. A patineur rarely sticks to just one chemical. They build up the color in thin, translucent coats, almost like a watercolor painter. This creates incredible depth, subtle highlights, and smooth transitions. For example, they might start with a base of ferric nitrate for a warm brown, then add a light mist of cupric nitrate into the crevices to suggest hints of green aging. This layering is a huge part of what makes the answer to how are bronze statues made so fascinating.
Patination is also the final stage where you might find other identifying marks. If you're curious about the symbols that tell the story of a sculpture's creation, our guide on how to identify foundry marks on bronze is a great resource.
The table below shows some of the go-to chemicals and the colors they typically produce.
Common Patina Chemicals and Their Color Effects
| Chemical Compound | Typical Color Result | Application Method |
|---|---|---|
| Ferric Nitrate | Rich, warm browns and reddish-golds | Often brushed or sprayed on as a foundational earthy tone. |
| Cupric Nitrate | Light greens to deep emeralds and blues | Sprayed or stippled to mimic natural, age-related verdigris. |
| Liver of Sulfur | Browns to deep, velvety blacks | Applied to create strong contrast and darken recessed areas. |
| Bismuth Nitrate | Pearly, opaque whites and pale grays | Used for creating unique highlights or stark, modern finishes. |
The true skill lies in knowing how to combine these chemicals to create a finish that feels both intentional and completely natural.
Sealing and Protecting the Masterpiece
Once the patineur is happy with the depth and color of the patina, there's one last crucial step: sealing the surface. After the statue has cooled down completely, a high-quality paste wax is carefully applied and buffed.
This wax accomplishes two things. First, it instantly deepens the colors of the patina, giving the surface a beautiful, soft luster. More importantly, it acts as a protective barrier. This final wax coat seals the bronze from moisture, air pollutants, and oils from fingerprints, locking in the finish and stopping any further, uncontrolled oxidation in its tracks.
For any outdoor sculpture, this protective wax coat should be reapplied every year or two. This simple maintenance ensures the statue's beauty will endure for generations, preserving the artist's final vision against the elements.
Common Questions About Making Bronze Statues
The journey from a simple clay model to a finished bronze statue is long and complex, a real blend of artistic vision and technical grit. Even after walking through the process, you probably still have some questions floating around. It's totally natural.
Getting a handle on the time, structure, and upkeep involved really deepens your appreciation for these incredible works of art. Let's tackle some of the most common questions people have.
How Long Does It Take to Make a Bronze Statue?
This is probably the number one question, and the honest answer is: it depends. There's just no single timeline. The statue's size, the intricacy of its details, and the foundry's own schedule all play a huge role.
A small, fairly simple tabletop piece might be done in as little as six to eight weeks. But a life-sized or monumental public sculpture? That's a much bigger commitment. You're often looking at anywhere from six months to well over a year from the first touch of clay to the final installation.
So, why the long wait?
- Waiting for Things to Dry: It's not just about active work. The silicone for the master mold and every single layer of the ceramic shell need time to cure and harden properly. Rushing this just isn't an option.
- The Artist's Touch: The initial clay sculpting and the later wax chasing are painstaking, hands-on jobs. Artists can spend countless hours tweaking every single curve and line until it's perfect.
- The Foundry's Schedule: A busy foundry is like a well-oiled machine, juggling multiple projects at once. The kiln and the pouring floor are always in demand, so a new project has to find its slot in a carefully managed workflow.
Why Are Most Bronze Statues Hollow?
It seems a bit strange at first, right? But almost all bronze statues are hollow, and for a few very smart reasons. Trying to cast a large, solid bronze statue would be a logistical nightmare.
First off, there's the sheer weight and cost. Bronze is a heavy, expensive metal. A hollow casting uses way less of it, which makes the final piece lighter and more affordable. A solid life-sized statue would be unbelievably heavy, making it a massive headache to transport and install.
But the most important reason is actually about structural integrity. It all comes down to how molten metal cools.
As bronze cools, it shrinks. If you cast a statue solid, the outside would cool and harden first while the core was still molten. This difference in cooling would create massive internal stress, all but guaranteeing severe cracks that would compromise the entire piece.
A hollow form with walls of a uniform thickness cools down much more evenly. This gives you a stronger, more stable final product without the hidden stresses that could cause it to fail down the road.
How Do You Clean and Care for a Bronze Statue?
Taking good care of a bronze statue is key to keeping it beautiful, especially if it lives outdoors. The whole point is to protect that delicate patina from weather and pollution. The good news is, routine maintenance is pretty simple.
For a regular cleanup, just grab a soft, natural-bristle brush and give the surface a gentle dusting to get rid of any loose dirt. Steer clear of synthetic bristles—they can be too abrasive.
Once or twice a year, you can give it a gentle bath. Use distilled water and a tiny bit of mild, non-ionic soap. Wipe the surface with a soft cloth, rinse it really well with more distilled water (you don't want any soap residue left), and just let it air dry. Whatever you do, don't use harsh chemical cleaners or scrubby pads; they can permanently ruin the patina.
The most critical part of long-term care is waxing. A thin coat of a good paste wax, applied every one to two years, creates a protective shield.
- Use a clean, soft cloth to apply a very thin, even layer of wax.
- Let the wax dry until it looks like a light haze.
- Take another clean, soft cloth and gently buff the surface to a soft sheen.
This wax layer takes the hit from the elements, protecting the patina and the metal underneath. For collectors, knowing how to care for bronze is just as important as knowing how it was made. If you're into older pieces, learning to identify different types of antiques can also give you great context for how to preserve them.
Have an antique statue or another treasure you'd like to know more about? Curio puts an expert in your pocket. Snap a photo to instantly identify your item, learn its history, and get an estimated value. Download Curio today and uncover the stories behind your finds at https://www.curio.app.