Learning to identify antique furniture is like learning a new language. At first, it's all a jumble, but soon you start to recognize patterns. I've found that breaking it down into five core inspection areas is the best way to get started: look at the wood, check the construction, identify the design period, inspect the hardware, and hunt for a maker's mark.
This methodical approach helps you move past the surface-level looks and start reading the story the piece is telling. It’s what turns a quick glance into a confident assessment.
Your First Look at Identifying Antique Furniture
Stepping into the world of antiques really does feel like becoming a detective. Every scuff mark, joint, and carving is a clue pointing to a piece’s true age and origin. To get it right, you need a reliable method—a mental checklist you can run through every time you find a potential treasure. Think of this guide as your starting point, giving you the confidence to investigate any item with a more trained eye.
Before we dive in, let’s get the terminology straight. Generally speaking, an item needs to be at least 100 years old to be officially called an antique. Anything younger usually falls into a different category. If you want to get clear on the terms, we have a whole guide explaining what is the difference between vintage and antique.
The Five Pillars of Authentication
I like to think of a first look as a high-level inspection covering five critical areas. Each one offers a piece of the puzzle, and when you put them all together, they paint a complete picture of an item's history. A genuine antique will tell a consistent story across all five pillars, whereas reproductions often give themselves away with jarring inconsistencies.
Here’s what I always focus on during an initial assessment:
- Wood and Materials: Is it solid wood or a veneer? Does the type of wood—oak, mahogany, or pine, for example—make sense for the period it supposedly comes from?
- Construction and Joinery: I always look for hand-cut dovetails, wooden pegs, and other signs of craftsmanship from before the industrial age. Perfectly uniform, machine-cut joints are a dead giveaway for modern pieces.
- Style and Design: Does the overall shape, the ornamentation, and the form fit with a known historical period? You'll start to recognize the signatures of Queen Anne, Chippendale, or Art Nouveau styles.
- Hardware and Finish: Are the handles, knobs, and locks original? A big one for me is the patina—that soft glow that comes from decades of age and use. Does it look authentic or has it been artificially distressed?
- Maker’s Marks and Labels: It pays to be nosy. Check hidden spots like the inside of drawers, underneath tabletops, or on back panels for any stamps, labels, or signatures that identify the creator.
My key piece of advice for beginners: authenticity is rarely proven by a single clue. It's the cumulative weight of the evidence—how the materials, construction, and style all align—that truly confirms a piece's age and value.
This quick table is a handy reference for comparing the tell-tale signs of a real antique versus a modern look-alike.
Quick Guide Antique vs Reproduction Furniture
| Characteristic | Authentic Antique Signs (Pre-1900) | Modern Reproduction Signs |
|---|---|---|
| Joinery | Slightly irregular, hand-cut dovetails. Use of wooden pegs. | Perfectly uniform, machine-cut dovetails. Modern screws and glue. |
| Wood | Solid, heavy wood; single board construction for surfaces. | Lighter woods, particleboard, or uniform veneers. |
| Wear | Logical wear patterns (e.g., worn drawer runners, faded armrests). | Artificial, uniform distressing. Wear marks in illogical places. |
| Hardware | Single-slot screws, hand-forged pulls with slight imperfections. | Phillips head screws, mass-produced hardware. |
| Symmetry | Slight asymmetry; charming imperfections from hand tools. | Perfect, symmetrical construction from modern machinery. |
Remember, this is a starting point. The more you look, touch, and study, the more these signs will become second nature, helping you spot the real deal from across a crowded room.
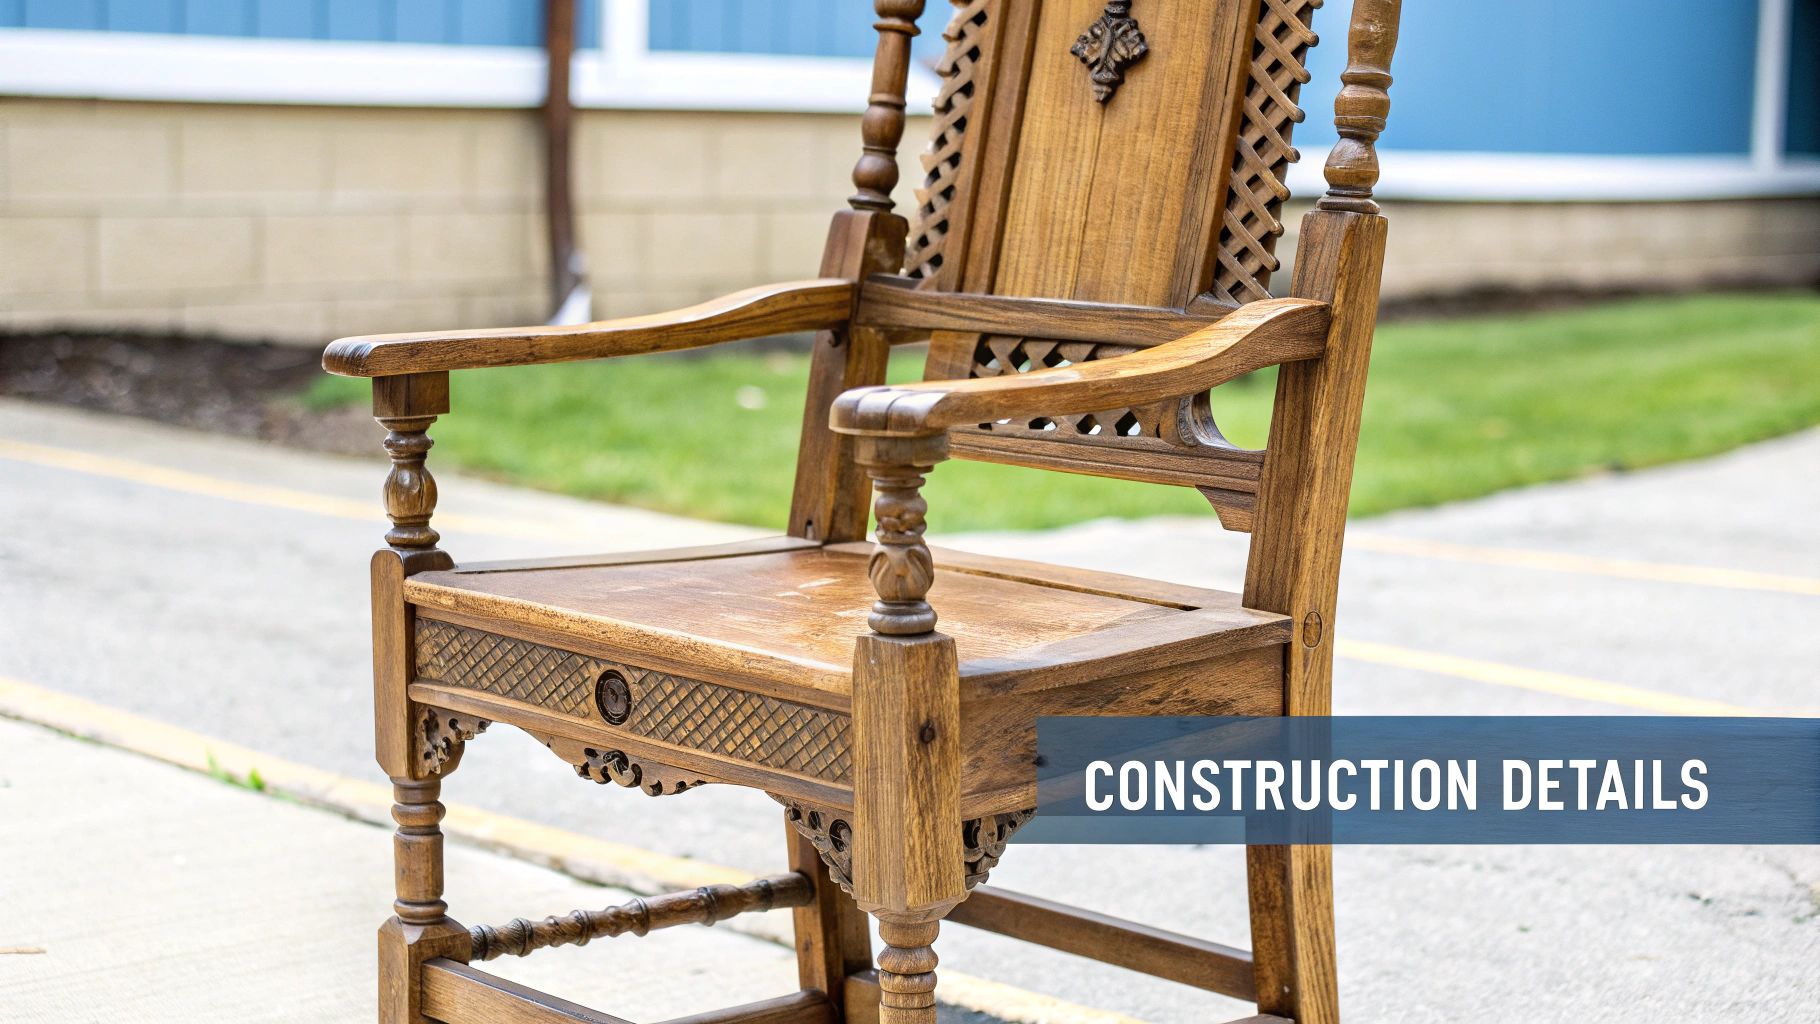
Reading the Clues in Wood and Construction
Every piece of antique furniture tells a story, and its most honest narrator is the wood itself. The type of timber used, how it was cut, and the way it was all joined together offer some of the most reliable clues for anyone learning how to identify antiques. Before you even get to style or hardware, a close look at the material and craftsmanship can reveal a piece's age and origin.
The physical evidence is all right there. You just need to know what you’re looking for.
Understanding the Language of Wood
Different woods were popular during different eras and in different places, mostly due to what was available and what was in style. For example, early American colonial furniture was almost always made from local woods like oak, maple, and pine. Oak was a dominant choice in the 17th and early 18th centuries for its sheer durability, giving pieces from this period a heavy, substantial feel.
Once global trade opened up, exotic woods became the height of fashion. The Georgian period (roughly 1714-1830) is famous for its use of rich, dark mahogany imported from the Caribbean. Later on, during the Victorian era, rosewood and walnut became highly sought-after for their beautiful, decorative grain. Learning to recognize these woods is a fundamental skill for placing a piece within its historical timeline.
A quick rundown of common woods by era:
- 1600s – Early 1700s: Primarily Oak, Pine, and Maple.
- Mid-1700s – Early 1800s: Mahogany and Walnut became dominant.
- Victorian Era (1837-1901): Rosewood, Walnut, and Mahogany were heavily used, often with decorative veneers.
A key takeaway I've learned is to always inspect the "secondary" woods—the cheaper timber used for drawer bottoms, back panels, and internal frames. A mahogany chest might use pine or poplar for its unseen parts, a common cost-saving practice that is a strong indicator of authenticity.
The Telltale Signs of Hand Craftsmanship
Before the Industrial Revolution, every single piece of furniture was made by hand. This human touch left behind charming imperfections that are now the hallmarks of authenticity. These irregularities are your best friends when trying to distinguish a true antique from a modern, machine-made reproduction.
The joinery—or how the pieces of wood are connected—is the number one place to look.
One of the most reliable ways to identify an antique is by examining how it was built. Hand-cut dovetails, for instance, are slightly irregular and asymmetrical because a person, not a machine, made them. This is a stark contrast to the perfectly uniform dovetails you'll find in modern reproductions. The difference helps date pieces; hand-cut dovetails are found almost exclusively in furniture made before 1860, while machine-cut joinery took over after that. In fact, studies show over 70% of authentic pre-19th-century furniture displays these hand-crafted joinery signs.
Distinguishing Hand-Cut from Machine-Cut Joinery
The difference can be subtle, but once you know the signs, it becomes obvious.
| Joint Characteristic | Hand-Cut Dovetails (Pre-1860) | Machine-Cut Dovetails (Post-1860) |
|---|---|---|
| Symmetry | Slightly irregular and uneven. No two pins or tails are identical. | Perfectly uniform, symmetrical, and evenly spaced. |
| Pin Size | Pins are typically very thin and delicate. | Pins are usually thicker and more robust. |
| Scribe Lines | Faint lines may be visible where the craftsman marked the cuts. | No scribe lines are present. The cuts are clean and precise. |
Beyond dovetails, look for the use of wooden pegs or handmade nails to secure joints, a common practice before modern glues and screws became widespread. If you see a Phillips head screw, you can be sure that part of the piece is from the 20th century at the earliest.
Feeling the Finish and Surface
The surface of an old piece of wood also holds important clues. Before power sanders and planers, surfaces were smoothed by hand with planes. This process often left behind a very subtle, undulating ripple that you can feel with your fingertips and sometimes see when light hits it from the side.
A modern, machine-sanded surface will feel perfectly flat and lifeless in comparison.
Another critical detail is the saw marks. Early furniture was built with wood cut by a pit saw, which left straight, parallel saw marks running across the grain. The invention of the circular saw around 1840 left distinctive circular or arced marks. Checking the underside of tabletops or the back panels for these marks can be a huge help. You can learn even more by checking out our guide on https://www.curio.app/blog/how-to-date-antique-furniture.
Finally, consider the weight. Antiques were typically made from solid wood, often from single, wide boards for surfaces like tabletops or chest lids. This makes them significantly heavier than modern pieces, which often use lighter woods, particleboard, or veneers over a core. Simply picking up a drawer or feeling the heft of a small table can sometimes be the quickest indicator of its age and quality.
Decoding Styles and Design Periods
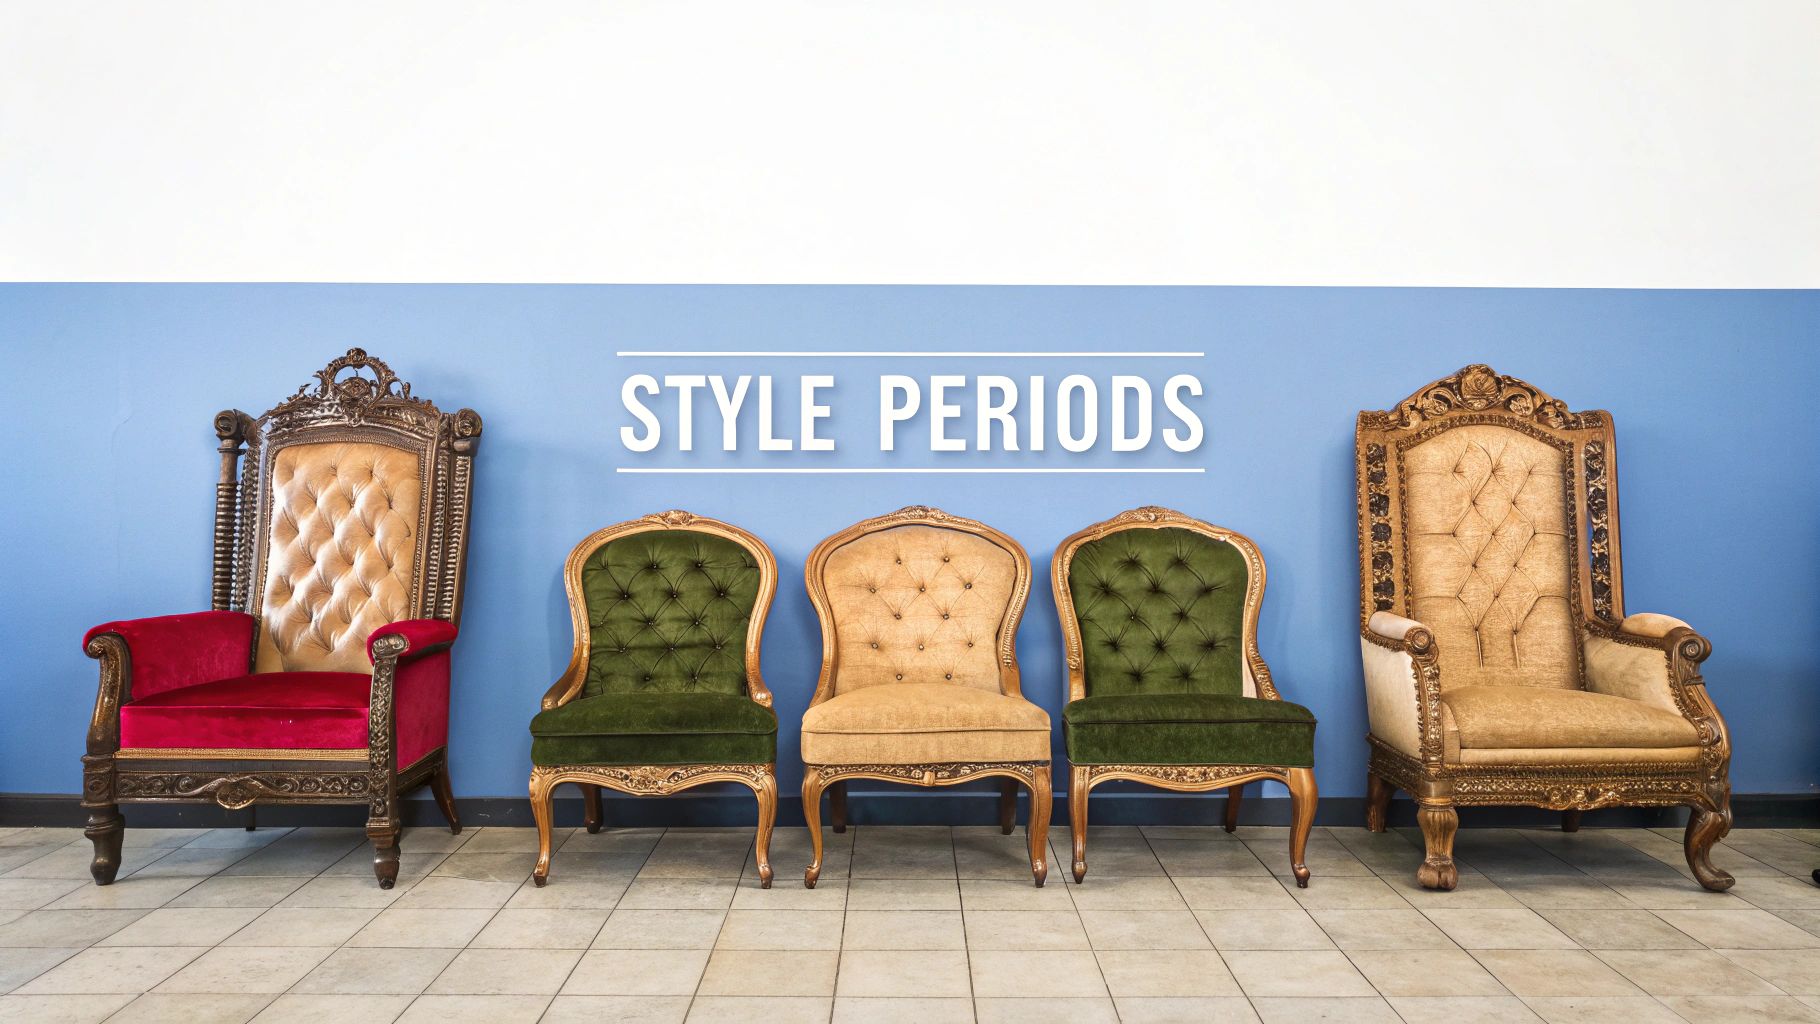
The wood tells you how it was made, but the style? That tells you when. Every piece of antique furniture was once a brand-new, fashionable item, a reflection of the art, culture, and values of its time. Learning to read these design cues is one of the most powerful skills you can develop for identifying antiques.
The shape of a leg, the curve of an armchair, or the specific type of ornamentation are all dead giveaways. Once you can recognize the signatures of major design periods, you can often pinpoint a piece's age, sometimes down to a specific decade.
Queen Anne (Circa 1720-1760)
Think grace, comfort, and quiet elegance. The Queen Anne period was a direct reaction against the heavy, boxy furniture that came before it, introducing a sense of lightness and flow. These pieces were designed for intimate, comfortable living, not just for formal display.
The undisputed star of the show here is the cabriole leg—that beautiful S-shaped curve meant to look like an animal's hind leg. On simpler pieces, it ends in a plain pad foot, but on higher-end examples, you'll see the classic ball-and-claw foot.
When you're trying to spot a Queen Anne piece, keep an eye out for:
- Constant Curves: Everything seems to curve. Look for the distinctive vase-shaped back splat on chairs and the popular scalloped shell carvings.
- Understated Decoration: Unlike later styles, Queen Anne furniture lets its graceful silhouette do the talking instead of relying on heavy, ornate carving.
- Human-Centered Design: Chairs were made to be sat in, often with upholstered seats and curved backrests that actually fit the human body.
Chippendale (Circa 1750-1790)
Thomas Chippendale wasn't just a cabinetmaker; he was a design influencer. His groundbreaking book, The Gentleman and Cabinet-Maker's Director, published in 1754, was a pattern book that blended Gothic, Rococo, and Chinese styles, giving craftsmen everywhere a new playbook.
While it evolved from the Queen Anne style (the cabriole leg is still around), Chippendale furniture is noticeably more elaborate and solid. The ball-and-claw foot is practically a trademark of this period, often carved with incredible precision. Chair backs also became canvases for creativity, featuring intricate, pierced splats with ribbon and tassel motifs.
A great trick for spotting Chippendale is to look for its eclectic mix of influences. You might see a Gothic pointed arch on a chair back, Chinese-inspired latticework on a table, and the flowing, asymmetrical carving of French Rococo—sometimes all within the same workshop's portfolio.
Federal (Circa 1780-1820)
With the American Revolution over, the new United States was eager to forge its own identity. The Federal style, also called Neoclassical, was born from this spirit, embracing the classical ideals of democracy, order, and reason.
This was a major departure from the dramatic curves that dominated the earlier 18th century. Instead, you'll find clean, straight lines, geometric forms, and delicate, refined ornamentation. The focus shifted entirely to symmetry and elegance.
Key signs of a Federal piece include:
- Delicate Inlays: Craftsmen used contrasting wood veneers to create stunning inlays of fans, shells, and the iconic American eagle.
- Rich Veneers: Mahogany was the wood of choice, beautifully accented with lighter satinwood or maple for the inlay work.
- Elegant Simplicity: The overall feel is one of lightness and sophistication. Graceful forms took priority over the heavy carving of the past.
Victorian (Circa 1837-1901)
The Victorian era was defined by the Industrial Revolution and a rising middle class with money to spend and a desire to show it off. Furniture from this long and varied period is often what people imagine when they hear the word "antique"—it’s ornate, heavy, and draws inspiration from just about every historical style you can think of.
This is where you see a huge comeback for deep, complex carving, dark woods like rosewood and walnut, and tufted, plush upholstery. New machinery made it possible to mass-produce decorative elements that were once reserved for the very wealthy.
Look for a mix of these traits:
- Elaborate Carvings: Think flowers, fruits, and scrolling leaves covering just about every inch of a piece.
- Dark, Heavy Woods: Rosewood, walnut, and dark-stained mahogany were the favorites.
- A Mashup of Styles: It’s perfectly normal to find Gothic arches, French curves, and Rococo shells all on the same piece of furniture.
By getting comfortable with these distinct visual languages, you can start turning a confusing jumble of old furniture into a clear timeline, moving you one big step closer to making a confident identification.
Getting Up Close with Hardware, Finishes, and Wear

While the overall shape of a piece gives you a general idea of its style, it’s the little details that often tell the real story of its age. The hardware, finish, and wear patterns are like a piece's fingerprints—they're unique, incredibly hard to fake, and offer some of the most reliable clues you can find.
A modern reproduction might get the silhouette right, but these subtle signs of a long life are where its true origins usually give themselves away.
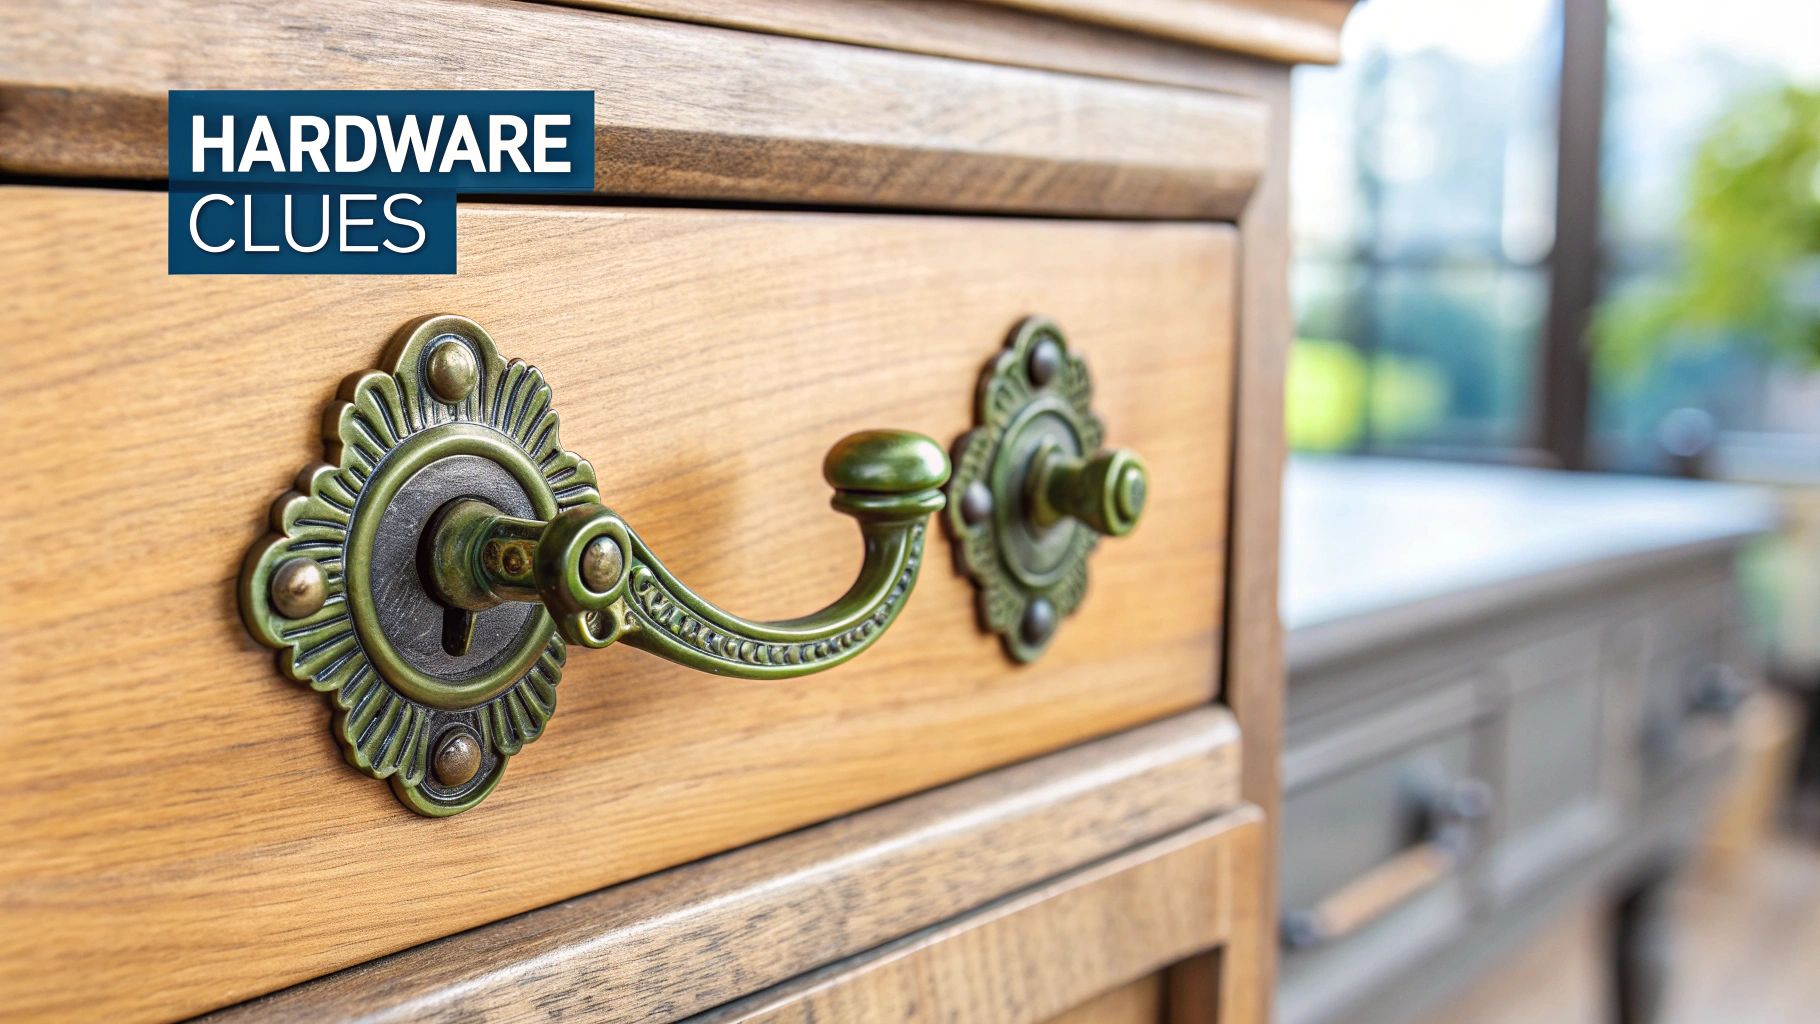
What the Hardware Can Tell You
The pulls, knobs, and screws on a piece of furniture are more than just functional parts; they're tiny technological time capsules. You'll find that original hardware almost always has slight imperfections and a natural patina that you just don't see in mass-produced modern equivalents.
One of the first things I always check is the screws. The humble single-slot screw was the go-to for centuries until the Phillips head screw came along in the 1930s. If you spot a Phillips screw on a piece that’s supposed to be from the 18th century, that’s a huge red flag. It’s either a later repair or, worse, not what it claims to be. On top of that, screws made before the mid-1800s were often handmade, so they won't look perfectly uniform like today's machine-made ones.
Here are a few other hardware clues to hunt for:
- Hand-Forged Pulls: Early hardware was often hammered out by a blacksmith, which means you’ll see slight asymmetries and a non-uniform finish. Modern cast hardware, by contrast, is perfectly identical.
- Backplates and Posts: Turn a drawer pull over and look for hand-threaded posts and nuts. The backplates might also have a slightly rougher texture compared to the smooth, stamped feel of modern versions.
- Keyholes: Take a close look at the escutcheon (the plate around the keyhole). Originals might be made of inlaid bone, ivory, or brass and will likely show wear from keys being used for decades.
The Beauty of Patina and Original Finishes
Patina is one of the most beautiful—and telling—signs of an antique's history. It’s that soft, deep glow that develops on a surface after years and years of polishing, exposure to air, and human touch. It’s not just grime; it's a complex chemical change in the finish itself.
An original finish, typically made from shellac, wax, or oil, has a mellow, almost see-through quality that modern polyurethane just can't imitate. Polyurethane is a type of plastic that creates a hard, often glossy film that sits on top of the wood. Older finishes feel more like they're part of the wood.
A genuine patina is a map of a piece's life. It will be a bit darker in protected corners and lighter or more worn where hands have rested, like the edges of a tabletop or the arms of a chair. This subtle variation is incredibly difficult to fake well.
A new piece that's been artificially "distressed" usually has a flat, one-dimensional look. The "wear" marks might feel rough or look like they were made with sandpaper, lacking the smooth, logical patina that comes from years of authentic use.
Reading the Story of Natural Wear and Tear
Real wear tells a story that makes sense. It shows up in the places you'd expect it to, based on how the furniture was used every day. This is where you can really start to separate a piece with a genuine history from a modern reproduction trying to look old.
Just think for a moment about how someone would have interacted with the furniture over a hundred years. The signs of aging should follow a logical pattern.
Let's take an antique chest of drawers as an example:
- Drawer Runners: The wooden runners underneath the drawers should be worn smooth from being opened and closed thousands of times.
- Stops: The small wooden blocks inside the frame that keep the drawer from pushing in too far should show corresponding wear marks.
- Bottom Edges: The bottom edges of the drawer fronts might be slightly worn down from rubbing against the frame over the decades.
This principle of "logical wear" applies to any piece you're looking at. A chair's armrests will be smoother and maybe a bit lighter in color right where hands have rested. The front stretcher rail might be worn from people propping their feet on it. The feet themselves will have nicks and scuffs from being moved around.
Artificial distressing, on the other hand, is often random and nonsensical. You might find sanding marks on a back panel that would never be touched, or "wormholes" that are suspiciously uniform in size and spacing. True signs of age are earned, not just applied.
Finding the Maker's Mark and Tracing Its History
For an antique hunter, finding a maker's mark is like discovering a signature on a painting. It’s that one definitive clue that can turn an anonymous piece into a documented treasure, often sending its value soaring. These marks are the fingerprints left behind by the artisans and companies that created the furniture.
These identifiers are the first thread you pull to unravel a piece's provenance—its documented journey through time. If you're serious about identifying antique furniture, learning to hunt down and research these marks is a skill you absolutely have to master.
The Hunt for Hidden Clues
Craftsmen rarely put their marks out in the open where they would disrupt the beauty of their work. That means you’ll need to do a little detective work. So, grab a flashlight and get ready to search the most common hiding spots.
You'll often find marks in these places:
- Inside or on the bottom of drawers: This is probably the most common spot for a stamp, label, or even a scrawled signature.
- On the back panels of case furniture: Check the backs of chests, cabinets, and dressers for ink stamps or old paper labels.
- Underneath tabletops or chair seats: Don't be afraid to carefully flip a piece over. The underside is prime real estate for a hidden mark.
- On the inner frame or legs: Sometimes a brand or stamp is tucked away on an inconspicuous part of the wooden frame.
A personal tip from my own experience: always check around the hardware and joints. I've often found a small, subtle stamp near an original screw or alongside a dovetail that gave me the instant confirmation I was looking for.
Types of Maker's Marks You Might Find
Marks come in all shapes and sizes, and each one tells a different story. A hand-carved initial hints at a small, bespoke workshop, while a polished metal tag suggests a larger, more established manufacturer.
Here are a few common types you’ll run into:
- Paper Labels: These were popular in the 19th and early 20th centuries and can offer a wealth of information, like the maker’s name and city. They’re fragile, though, and often get damaged or peeled off over the years.
- Ink Stamps: Larger companies loved this quick and efficient method. Stamps were applied directly to the wood but can fade over time, so you might need good lighting to spot them.
- Branded Marks: Created by burning the maker's logo into the wood with a hot iron, these marks are incredibly durable. The Stickley company, for example, is famous for its distinct branded mark on Arts and Crafts furniture.
- Embossed Metal Tags: Small brass or copper tags were often nailed onto a piece, serving as a permanent and professional-looking seal of quality.
From Mark to History Using Digital Archives
Finding the mark is just the beginning. The real fun starts when you trace its history. Research shows that roughly 60-80% of collectible pieces from well-known American and European makers have some form of identifying mark. This is where modern technology becomes your best friend.
It's easier than ever to do this research from your own home. By 2025, over 10,000 vintage furniture company catalogs have been scanned and made searchable online, which can help you identify a manufacturer in seconds. You can learn more about how to identify vintage furniture to better understand this process.
Online databases and digital archives are absolute goldmines for this work. Websites like the Internet Archive host enormous collections of digitized trade catalogs, furniture design books, and historical records that can help you link your mark to a specific company and era.
These resources allow you to compare your piece's style and its mark against documented examples, confirming its age and origin with real confidence. This is how you transform a good guess into a solid attribution and build a compelling, fact-based story for your antique.
Common Questions About Identifying Antiques
As you start exploring the world of antiques, you'll quickly realize a few questions come up time and time again. Getting a handle on these from the get-go will help you sidestep some common rookie mistakes and feel more confident when you spot a potential treasure.
This section is your quick-reference guide. We’ll tackle the tricky details that often trip up newcomers, from the difference between style and age to how repairs affect a piece's history and worth.
What Is the Most Common Mistake When Identifying Antique Furniture?
The single biggest mistake I see people make is confusing the style of a piece with its actual age. It's an easy trap to fall into. Someone can make a chair today in the "Queen Anne style," but that absolutely does not make it a Queen Anne antique.
A genuine antique tells a consistent story. Its construction, materials, and wear patterns all have to align with the period it supposedly comes from.
Always look for a combination of clues. Just going by the overall shape is a recipe for getting it wrong. Instead, you need to get hands-on. Check the joinery, identify the wood, look for old saw marks, and feel the patina. When all those elements point to the same conclusion, you're on the right track.
Does a Repair Mean a Piece Is Not a Valuable Antique?
Not at all. In fact, it's incredibly rare to find a piece of furniture that's over 100 years old and in flawless condition. Just imagine a century of daily life—it’s going to leave a few marks. A well-done, period-appropriate repair is often perfectly acceptable to collectors and might not harm the value much, if at all.
What really matters is the quality and honesty of the repair. An old, skillful fix can sometimes even add to a piece's character. The things that kill value are modern, sloppy repairs like using Phillips screws on a Georgian chest, slathering on polyurethane, or replacing original brasses with cheap reproductions.
How Can I Spot a Fake Patina vs. Natural Aging?
This is a skill that truly comes with experience, but there are definitely tells. A real patina is something that develops slowly, over decades of use, polishing, and exposure to the elements. It creates a deep, mellow glow with subtle variations in color, especially where hands have rested for years. It should feel wonderfully smooth, almost soft to the touch.
A modern "distressed" finish, on the other hand, often looks too uniform and feels flat or even rough. You might see a plasticky sheen from a modern topcoat. More importantly, the wear marks often look random or forced, rather than appearing in logical places where a hand, arm, or foot would naturally cause wear over time. Once you get a feel for this, you can learn more about valuing antique furniture with much greater confidence.
Ready to turn your curiosity into expertise? With the Curio app, you can identify antiques instantly with just a photo. Get in-depth historical context, estimated values, and visual matches to compare your finds. Download Curio today and let your antiques tell their story. https://www.curio.app