Before you even think about reaching for polish, the first and most important step is figuring out exactly what you're dealing with. Is it solid brass or just a thin plating? The answer changes everything. Using the wrong cleaning method can permanently damage your piece, so taking a moment to identify the material is non-negotiable.
Is It Solid Brass or Just Plated?
A lot of items that look like brass are actually made of steel or another metal with a very thin brass coating. When you're cleaning something that's plated, you have to be incredibly gentle. Any aggressive scrubbing or harsh polish can rub right through that thin layer, exposing the duller metal underneath. Once that happens, there’s no going back.
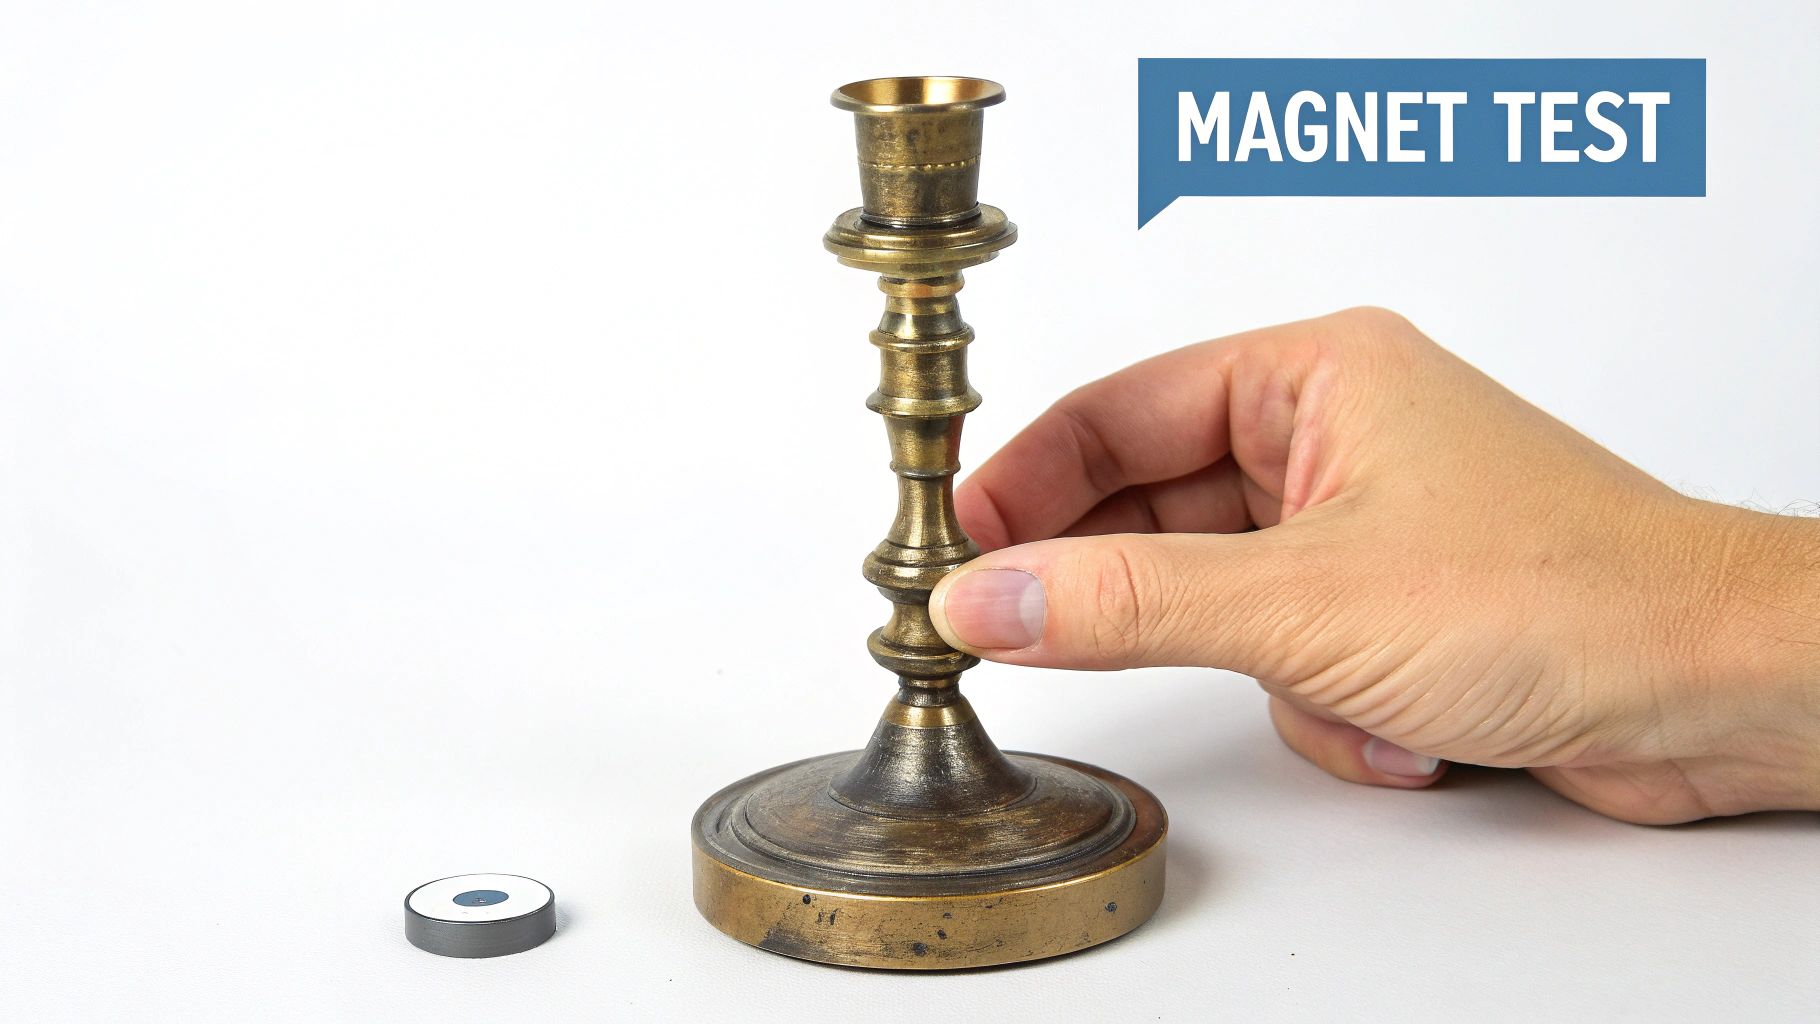
The Foolproof Magnet Test
Here’s the simplest, most reliable trick in the book. Just grab a regular refrigerator magnet and see if it sticks to your item.
- If the magnet doesn't stick: Fantastic! You've got solid brass on your hands. Since brass is a non-ferrous alloy, it isn't magnetic. This means you have a wider range of cleaning options.
- If the magnet sticks: This piece is brass-plated. The magnet is clinging to the iron-based metal core beneath the plating. You'll need to proceed with extreme caution.
This quick test literally takes seconds, but it dictates your entire cleaning approach from here on out. I’ve seen it with countless pieces, like the delicate finish on many https://www.curio.app/blog/antique-brass-inkwells, which is often plating and requires the softest touch to preserve its beauty.
The more you know about your antique, the better you can care for it. For instance, understanding the difference between brass and bronze can give you more clues about its history and proper handling.
Lacquered vs. Unlacquered Finishes
There's one more thing to check: whether the brass has a protective lacquer coating. Many newer and some older brass items were sealed with a clear lacquer to keep them from tarnishing. If that coating is still in good shape, a simple wipe-down with a damp cloth is all it needs. Polish won't get through the lacquer and can actually make the surface look cloudy and dull.
Pro Tip: To check for lacquer, find a hidden spot on your item. Dab a tiny bit of brass polish on a cotton swab and rub gently. If the swab turns black, the brass is unlacquered. If it stays clean, there's a lacquer finish.
What if the lacquer is peeling or chipped? Now you have a decision to make. You can either have it professionally stripped and re-lacquered or carefully remove the rest of it yourself before polishing the raw brass. If you try to clean it without addressing the damaged lacquer, you'll end up with a splotchy, uneven mess.
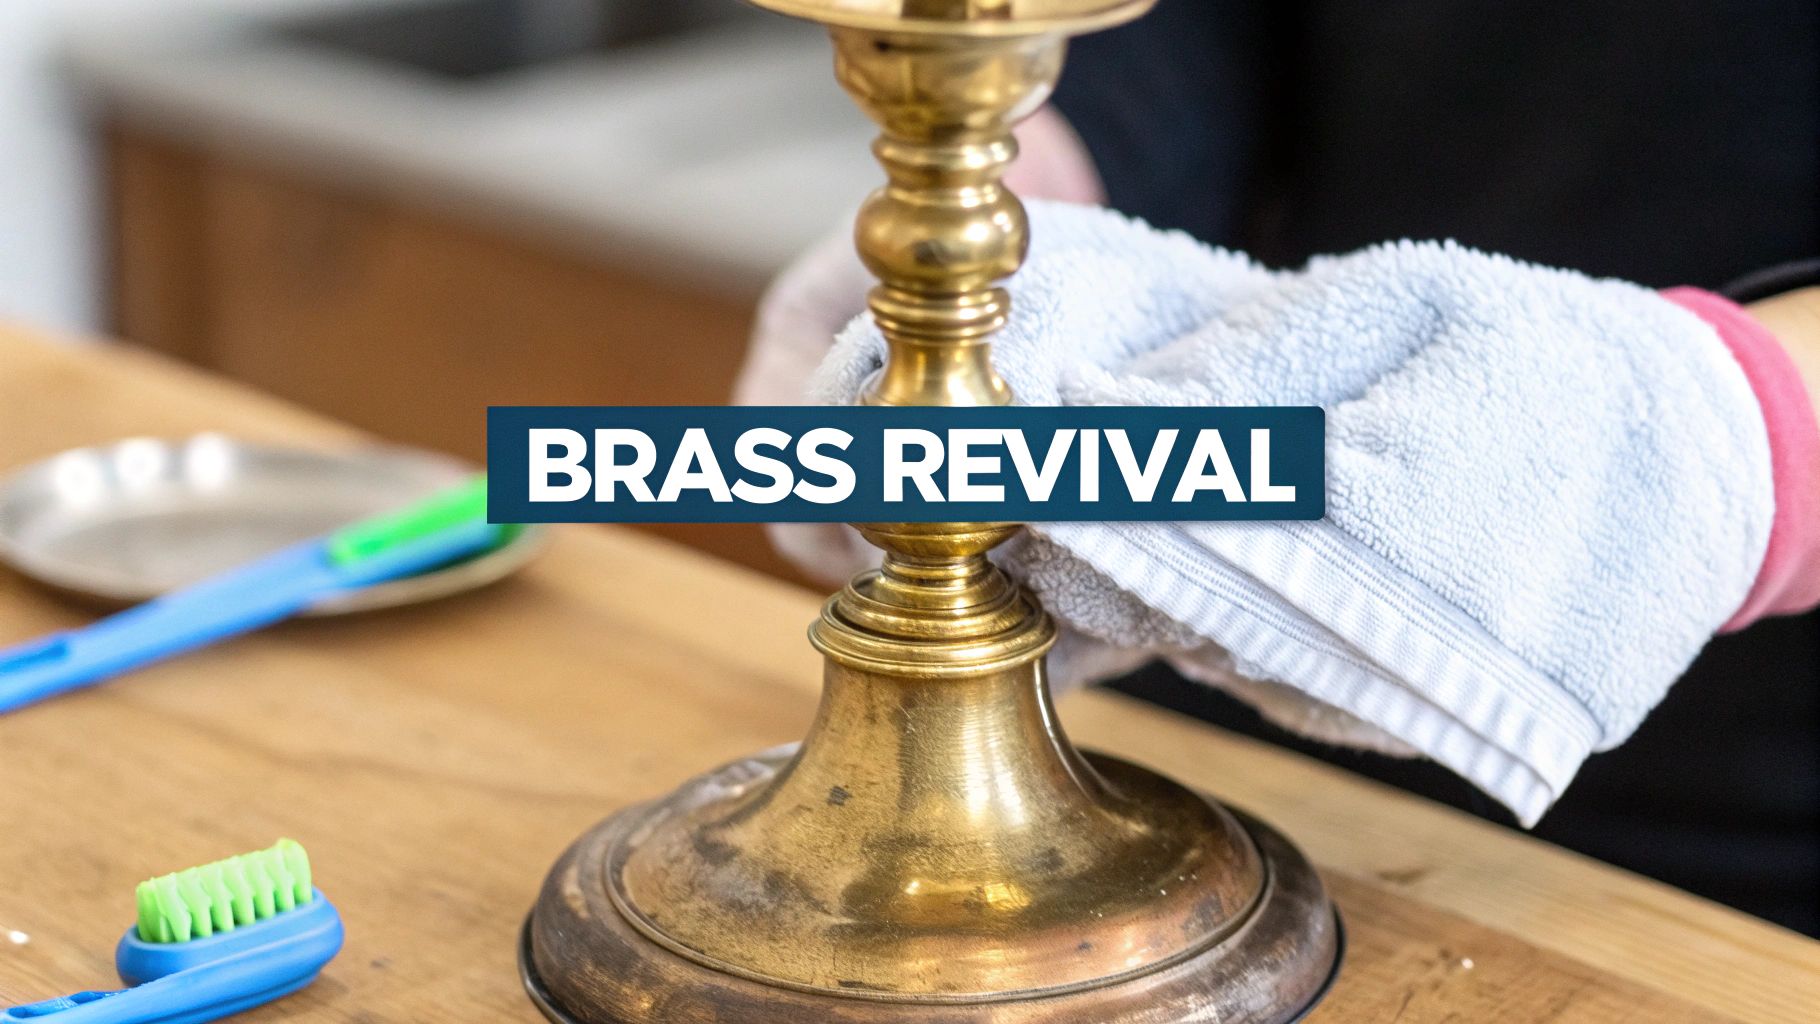
Starting With a Gentle Surface Clean
Before you even think about reaching for polish, the first step in cleaning any piece of antique brass is always the gentlest one. This isn't just about getting rid of dirt. It's about carefully lifting away years of dust, grime, and finger oils without accidentally wiping away the very history that makes the piece special.
That beautiful, aged layer on the surface is called a patina, and it's the brass's story written over time. Collectors and antique lovers prize this feature; stripping it away with harsh cleaning is a mistake you can't undo. A shiny, new-looking finish can plummet an antique's value. Think of it as dusting off a masterpiece, not scrubbing it down to a blank canvas.
Your Go-To Cleaning Kit
For this all-important first pass, you only need a few simple things, most of which are probably already under your kitchen sink. The secret is to keep it basic.
- Mild dish soap: Just a few drops of a gentle liquid soap will do the trick. I usually reach for basic blue Dawn. Just make sure to avoid anything with harsh degreasers, bleach, or citrus additives.
- Warm water: A small bowl of warm (not hot) water is all you need to mix up a simple, soapy solution.
- Soft cloths: Grab at least two lint-free cloths. Microfiber cloths are great, but a clean, old cotton t-shirt works just as well. You'll need one for washing and one for drying.
- A soft-bristled toothbrush: An old toothbrush is your best friend for getting into those tiny, detailed spots without scratching the surface.
This approach is the foundation of good antique care. It respects the material and its history, ensuring you’re enhancing its beauty, not erasing its character. Preservation always comes first.
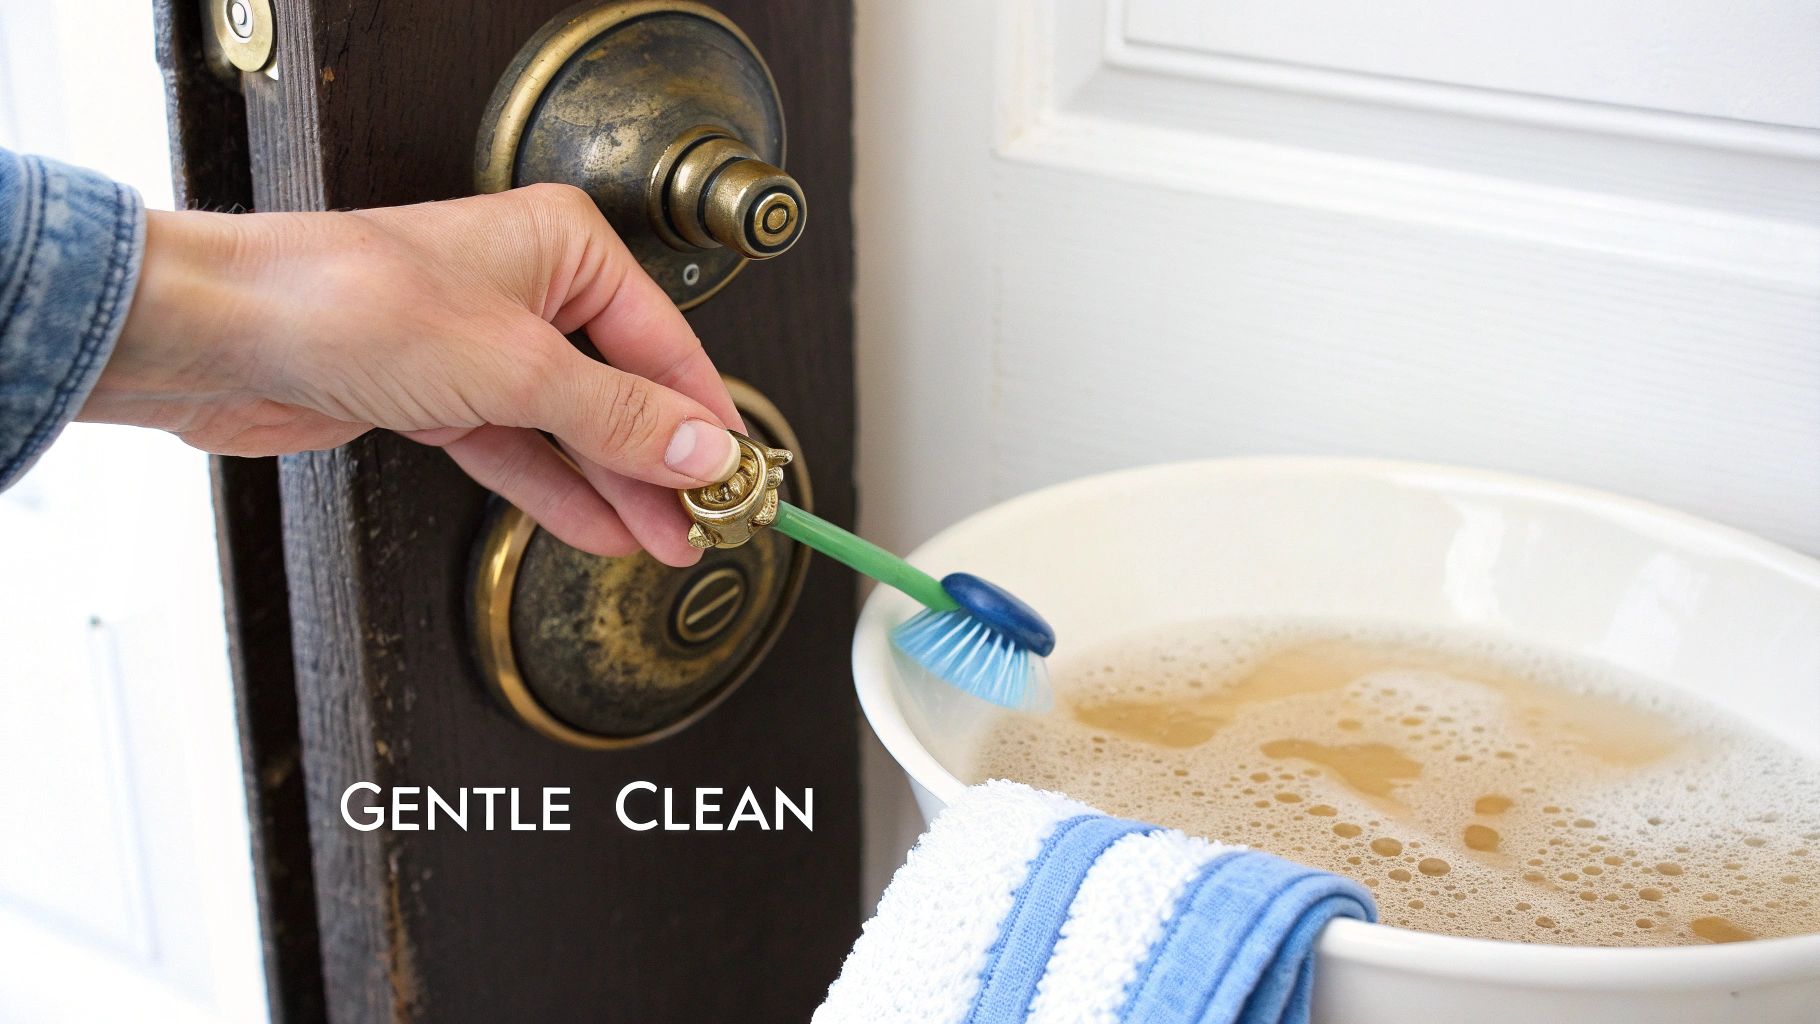
The Gentle Cleaning Method
Cleaning antique brass is all about finding that delicate balance between removing grime and preserving the invaluable patina. I always start with a soft cloth dipped in a bit of warm, soapy water—and I never, ever submerge the entire piece. For those tricky, ornate areas, a soft toothbrush gets the job done perfectly. This method is far superior to common DIY recipes you might see online involving lemon juice or baking soda, which can cause permanent damage and strip away value. You can find more expert advice on why this gentle approach is best at Hemswell Antiques.
First, dip your cloth into the soapy water and wring it out really well. It should be just damp, not dripping. You want to avoid getting water into any joints or hollow spots where it could sit and cause corrosion down the line.
Now, gently wipe down the entire piece. I find that using small, circular motions with very light pressure works best. You’ll be surprised at how much grime comes off onto the cloth.
A Tip from Experience: I was recently working on a gorgeous old brass candelabra with incredibly intricate floral details. A damp cloth worked for the main stems, but the flower petals were caked with decades of dust. I used a soft toothbrush, dipped it in the soapy water, and then flicked off the excess liquid. It was the perfect tool for getting into every little crevice without harming the patina one bit.
Once you’ve wiped the piece down, take a second cloth, dampen it with plain water, and go over it again to remove any soap residue.
Finally—and this part is non-negotiable—use a third, completely dry cloth to buff the piece until it's totally dry. Leaving even a little moisture behind is an open invitation for new tarnish to form.
Choosing the Right Cleaning Solution
So, a gentle soap-and-water bath didn't quite do the trick for that deep-seated tarnish. This is the moment of truth for any antique owner. Do you mix up a traditional, natural remedy from your pantry, or reach for a heavy-hitting commercial polish? The path you choose here is a big deal—it can either revive your piece or accidentally strip away its history and value.
Honestly, the "right" choice comes down to what you're trying to achieve and how stubborn the tarnish is. Most seasoned collectors I know always start with the most gentle approach first. A simple homemade solution often provides just enough cleaning power without the risk that comes with harsh chemicals, helping you keep that lovely, time-worn character intact.
A Gentle Revival With a Homemade Paste
For brass with light to moderate tarnish, you often don't need anything more than a simple paste made from ingredients you already have. My go-to recipe is a classic for a reason: mix equal parts salt and flour, then add just enough white vinegar to create a thick, paste-like consistency.
The magic is in the chemistry. The vinegar’s mild acidity gets to work dissolving the tarnish, while the salt and flour act as a super-gentle abrasive to lift it away. It’s perfect for those pieces where you want a bit more brightness but are nervous about stripping off that beautiful, dark patina. I’ve had great success with this on everything from old drawer pulls to candlesticks that just needed a little refresh.
Just apply the paste, let it work its magic for about 30 minutes to an hour, and then rinse it off completely with warm water. The most important final step? Dry it thoroughly.
Key Takeaway: The beauty of the homemade paste is the control it gives you. You can leave it on for a shorter time for a subtle clean or let it sit longer for a more dramatic result, all without filling your home with chemical fumes.
Understanding the science behind tarnish removal can be really helpful. The way oxidation works on brass isn't entirely different from other metals. If you're curious, our guide on how to remove tarnish from silver dives a bit deeper into the chemistry, and the principles are quite similar.
When to Consider Commercial Polishes
There's a reason products like Brasso are household names—they are incredibly effective. When you're faced with a piece that's nearly black with tarnish or you're specifically aiming for that brand-new, mirror-like shine, a commercial cleaner might be your best bet. These formulas are designed to slice through heavy oxidation in no time.
But that power comes with a serious warning. Commercial polishes are far more aggressive and can easily obliterate decades of desirable patina, which can significantly decrease an antique's value and charm.
Deciding between a gentle home remedy and a powerful commercial product can be tough. This table breaks down the pros and cons to help you make the best choice for your specific piece.
Natural vs Commercial Brass Cleaners: A Quick Comparison
| Method | Best For | Patina Impact | Risk Level |
|---|---|---|---|
| Flour, Salt & Vinegar Paste | Light to moderate tarnish; brightening without stripping | Minimal; preserves aged character | Low |
| Lemon & Baking Soda | Light tarnish and general cleaning | Very gentle; can slightly lighten | Very Low |
| Commercial Polish (e.g., Brasso) | Heavy tarnish; achieving a high-shine, new look | High; can easily remove all patina | High |
| Ketchup or Tomato Paste | Moderate, stubborn spots | Moderate; acidity can be aggressive if left too long | Medium |
Ultimately, starting with a natural cleaner is almost always the safest first step. You can always move on to something stronger if needed, but you can never get a stripped patina back.
If you decide a commercial polish is necessary, please proceed with caution. Always start by testing a tiny, hidden spot. Apply a very small amount to a soft cloth, work it gently into the test area, and buff it off right away. Never let a chemical polish sit on the surface for an extended time. Afterward, rinse and dry the piece meticulously to make sure no chemical residue is left behind.
Common Mistakes That Can Ruin Your Antique Brass
It’s easy to get excited about bringing an old brass piece back to life, but that enthusiasm can sometimes lead to disaster. I've seen it happen too many times—a well-meaning cleaning effort with a popular DIY "hack" results in irreversible damage. When it comes to antiques, knowing what not to do is just as crucial as knowing the right steps.
One of the most heartbreaking and permanent mistakes is causing dezincification. This is a nasty form of corrosion where acidic cleaners, especially those homemade vinegar and salt concoctions, literally rip the zinc out of the brass alloy. This doesn't just stain the surface; it changes the metal's composition forever, leaving behind ugly pink or coppery splotches.
Think of brass as a partnership between copper and zinc. When a strong acid comes along, it breaks up that partnership, dissolving and carrying away the zinc. What's left behind is just the copper, creating those tell-tale pinkish spots that signal the metal has been fundamentally weakened. Once this happens, there's no going back.
The Danger of Dezincification and Harsh Acids
The temptation to use a quick pantry fix is understandable, but the risk to your antiques is huge. That popular paste made from flour, salt, and vinegar? It’s a recipe for disaster on old brass. The acid from the vinegar, combined with the abrasive salt, creates a potent corrosive agent that can trigger dezincification shockingly fast.
This isn’t just a theory; it's a major concern for professional conservators. Research has documented how improper chemicals can cause pink spots to appear in just a few hours. For a deeper dive, the Canadian Conservation Institute has detailed notes on the effects of dezincification on brass that are well worth a read.
This is exactly why you'll hear experts warn against using highly acidic solutions on valuable pieces. It might look like you're just wiping away tarnish, but you could be destroying the very fabric of the metal.
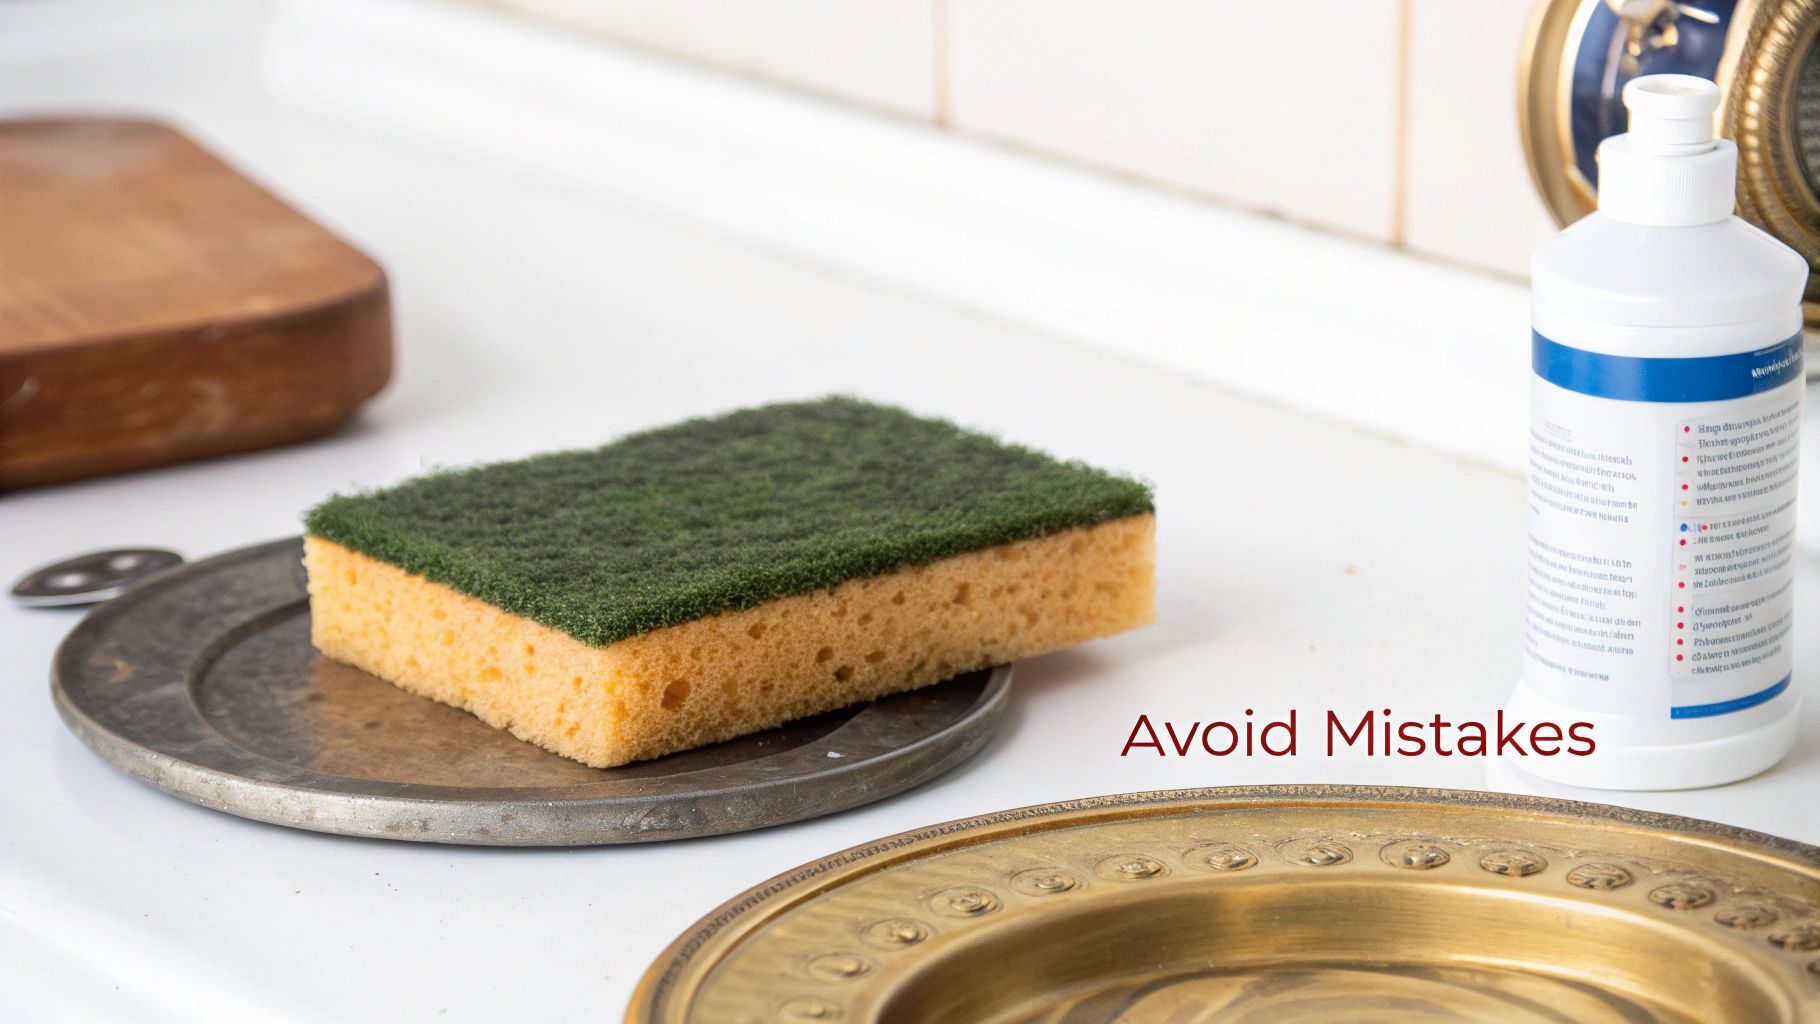
Overlooking Abrasives and Aggressive Polishing
Chemical damage isn't the only risk. Being too aggressive physically can be just as bad. It's so tempting to just scrub away at a stubborn dark spot, but reaching for the wrong tool can cause permanent harm.
Here are a few things to keep far away from your antique brass:
- Steel Wool: This will absolutely cover the surface in a fine web of scratches, dulling the finish for good.
- Stiff-Bristled Brushes: A soft, old toothbrush can be great for crevices, but anything harder will scratch the brass.
- Abrasive Powders: Scouring powders are designed to remove tough grime, but on brass, they’ll strip away the tarnish and the beautiful, desirable patina right along with it.
A core principle in antique care is to always start with the gentlest method possible. You can dial up the intensity if you need to, but you can never undo a scratch or put back the original surface you've just scrubbed away.
This "less is more" philosophy applies to other metals, too. For instance, our guide on how to clean a bronze statue stresses similar gentle techniques to preserve an item's history and value.
Over-polishing is another common error. The goal is rarely to make a 150-year-old candlestick look brand new. That soft, warm glow it's developed over decades is part of its story and character. Polishing away that history can dramatically reduce its value.
Finally, don't rush the final step. Failing to properly rinse and dry the piece is like inviting tarnish to come right back. Any leftover cleaner or moisture will immediately start to react with the air, creating new corrosion. Always rinse thoroughly, then dry with a soft, lint-free cloth until every drop of water is gone.
Keeping Your Polished Brass Looking Its Best
You’ve done the hard work of bringing that antique brass back to life. It’s tempting to put your feet up and just admire the shine, but there’s one last, crucial step: protecting it. If you don't, the brass is immediately exposed to the air, and tarnish will start creeping back in before you know it.
This final step is what turns a quick clean-up into a true restoration. By adding a protective layer and being smart about where you display your treasures, you can seriously slow down the natural tarnishing process. It's an investment of time that saves you from having to do deep cleans so often down the road.
The Big Debate: To Seal or Not to Seal?
When it comes to protecting brass, the main question is whether you should seal it. You really have two paths you can go down: a gentle wax coating or a more permanent lacquer. Each has its pros and cons, and the right choice depends on the piece and the look you're after.
- Microcrystalline Wax: This is my go-to, and it’s what most collectors and museum conservators use. It creates a very thin, invisible barrier against moisture and fingerprints but still allows the metal to breathe. The best part? It's completely reversible, which is essential for valuable antiques where you don't want to make permanent changes.
- Clear Lacquer: Lacquer offers a much harder, more durable shield. It’s a great option for high-touch items that need maximum protection. The downside is that it can give the brass a glossy, almost plastic-like finish that might not look right on an old piece. It's also a real headache to remove if it ever starts to yellow or peel.
For almost any antique piece, especially if it has significant value or a beautiful, aged patina, microcrystalline wax is the clear winner. It does the job without compromising the item's integrity.
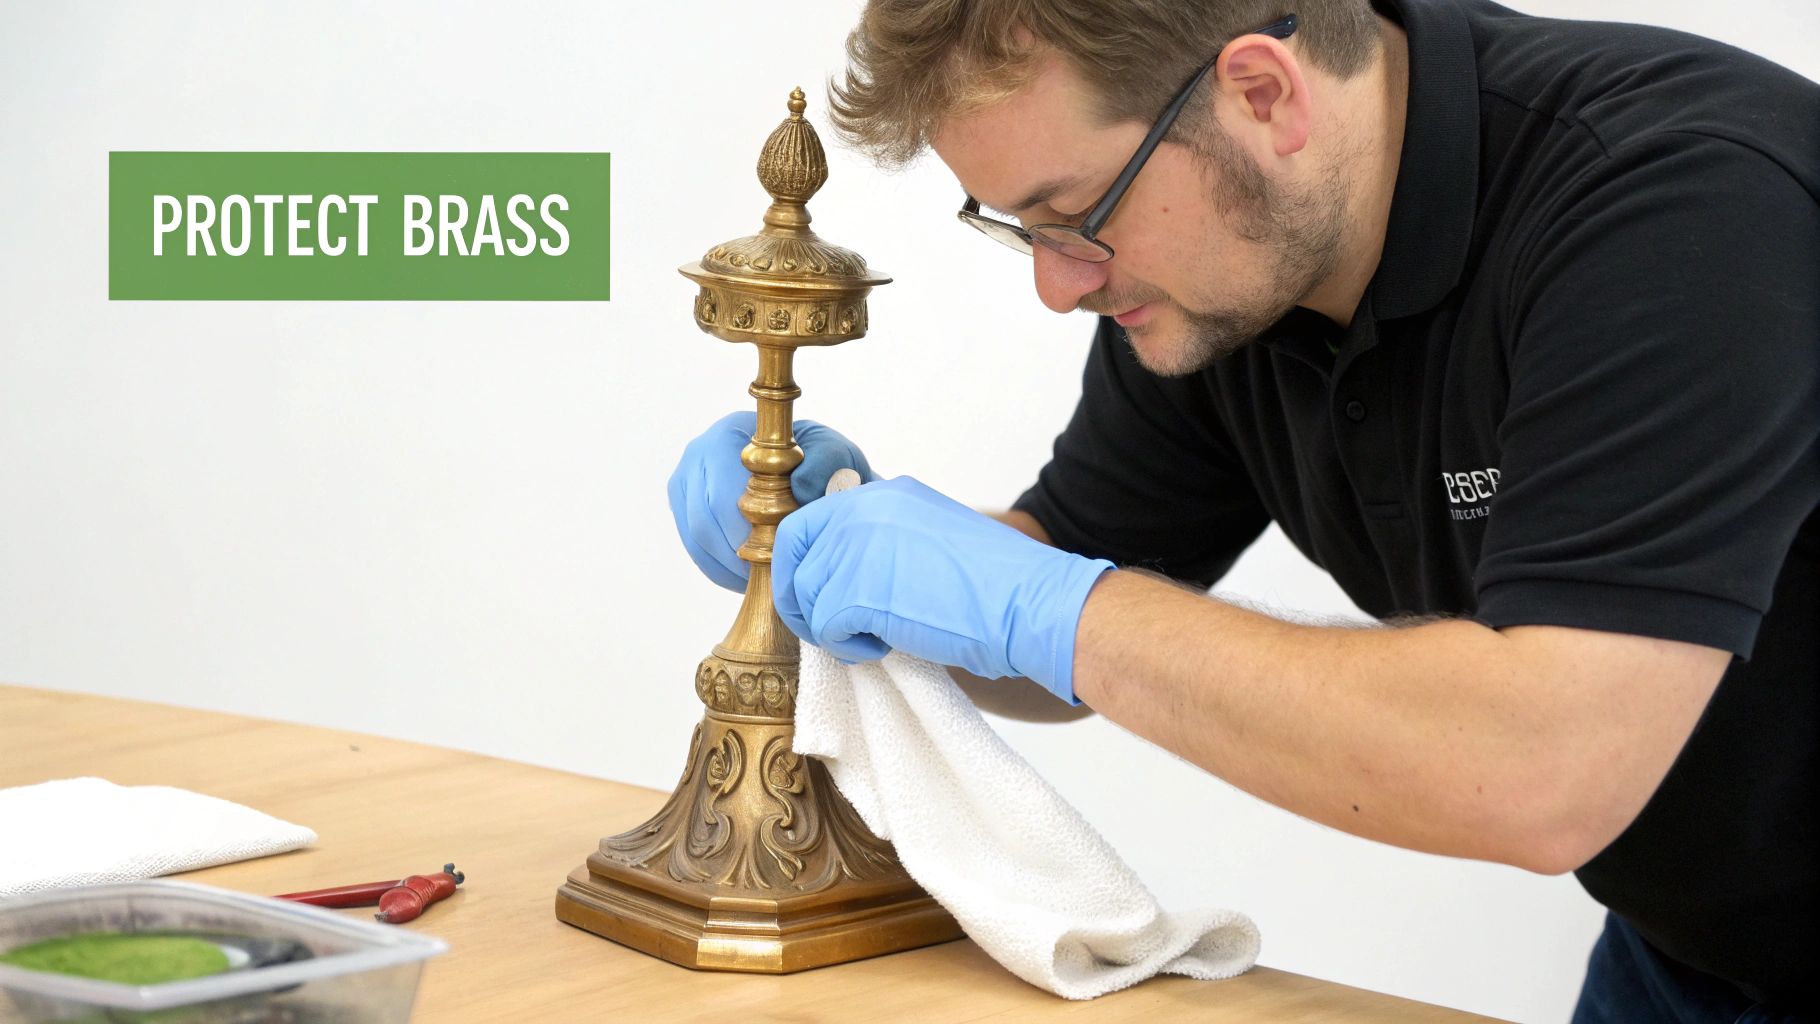
Applying the Finish and Thinking Long-Term
Putting on a wax coat is simple. Grab a soft, lint-free cloth and apply a very thin, even layer across the entire surface. Don't slather it on—a little goes a long way.
Let the wax dry to a light haze, which usually takes about 10-15 minutes. Then, take a clean cloth and gently buff the surface to a soft, warm sheen. You're aiming for an invisible shield, not a waxy buildup.
Beyond coatings, where you put your brass makes a huge difference.
Think Like a Curator: You wouldn’t leave a vintage car out in a storm right after waxing it. The same logic applies here. Placing your freshly polished brass candlestick in a humid bathroom or a windowsill with harsh, direct sunlight is just asking for tarnish to return.
The core idea is to create a barrier against the elements, a concept that's just as important for maintaining things like marine metal polish for chrome and stainless steel. A good protective layer is key, no matter the metal.
Finally, get into the habit of giving your pieces a quick, gentle dusting with a dry microfiber cloth every so often. This simple chore prevents airborne grime from settling on the surface and eating away at your protective wax coat. A few seconds of dusting can mean months, or even years, between deep cleanings.
Your Antique Brass Cleaning Questions Answered
When you're knee-deep in cleaning an old brass piece, it's easy to run into a few head-scratchers. Even with the best instructions, every antique has its own quirks. Let's walk through some of the most common questions that pop up, so you can feel confident you're not accidentally damaging your treasures.
How Do I Know if My Brass Is Lacquered?
Before you even think about polishing, you've got to figure out if you're dealing with a lacquered piece. Many older brass items were given a thin, clear topcoat to keep them from tarnishing. If that lacquer is still in good shape, polishing it is a big mistake—you'll just end up with a cloudy, scratched-up mess.
So, how can you tell?
- Look for a slight sheen. Lacquered brass often has a soft, semi-gloss look to it and tends to resist fingerprints.
- Check for tarnish. If the piece is old but still looks bright and shiny with no dark spots, there's a good chance it's sealed.
The easiest way to be sure is with a quick spot test. Find a hidden area, like the bottom of a lamp base. Put a tiny bit of brass polish on a cotton swab and gently rub. If the swab comes away black, you’ve got raw brass. If it stays clean, you’re looking at lacquer.
Can I Remove All the Patina?
This is a big one, and the answer is almost always a hard no. That soft, dark layer that develops over time is the patina, and it's a massive part of an antique's story, character, and value. Stripping a piece back to a factory-new shine can literally destroy its worth in the eyes of collectors.
Think of the patina as the antique's autobiography written on its surface. Wiping it away is like tearing out the pages. The only time you might consider a more aggressive polish is if the tarnish is so blotchy and uneven that it's truly unsightly, or if the piece has little to no real antique value to begin with.
A Collector's Insight: Unless the patina is so extreme that it's hiding the fine details of the piece, preservation is the name of the game. A warm, even patina is always more desirable than a harsh, modern shine.
What Should I Do About Green Spots?
Those little green or blue-green flecks are a type of corrosion called verdigris. It happens when the copper in the brass alloy reacts to moisture over many years. It's a sign of true age, but you need to deal with it carefully before it spreads and pits the metal.
First, whatever you do, do not try to scrape it off with a metal tool. You'll just scratch the brass underneath.
Instead, grab a cotton swab and dip it in a mild acid like lemon juice or white vinegar. Gently dab only the green spots, trying your best not to get the liquid on the surrounding patina. Let it sit for a minute or two, then use a fresh swab dipped in plain water to neutralize the acid. The final step is crucial: dry the area completely. This targeted approach gets rid of the damaging corrosion without sacrificing that beautiful, time-worn patina.
Have a piece you can't identify or value? The experts at Curio can help. Snap a photo and let our app uncover the history and worth of your treasures in seconds. Download Curio today and let your antiques tell their story