
Have you ever stood in front of a bronze statue and wondered how it came to be? How does an artist’s soft clay model transform into a permanent, powerful work of metal? The answer lies in a beautiful, ancient, and incredibly intricate process known as lost-wax casting. It’s a true blend of fine art and heavy industry, where delicate sculpting meets the raw power of a foundry.
The Craft of Casting Bronze Explained
Creating a bronze statue isn't a single event; it's a journey. This method has been honed over thousands of years, yet its core principles remain surprisingly consistent. It’s a testament to its effectiveness that every tiny detail—from the subtle texture of skin to the sweeping curve of a robe—is perfectly captured and preserved.
The life of a bronze statue doesn't start with metal. It begins with the artist's original vision, usually sculpted in a much softer material like clay or even plaster. This initial piece is everything; it’s the masterwork that holds all the form, emotion, and intention. From this one-of-a-kind original, a whole series of molds and copies are created, leading up to the most critical part of the process.
From Wax to Metal
The key to the whole operation is a hollow wax copy of the original sculpture. Think of it as a perfect, but temporary, replica. This wax version is then painstakingly coated, layer by layer, in a ceramic slurry. This builds up a thick, tough, and heat-resistant shell around the wax.
Once the ceramic shell is fully cured in a kiln, the heat melts the wax inside, which is then poured out. This leaves a void, a perfect negative impression of the sculpture inside the ceramic shell. This is where the name "lost-wax casting" comes from. The empty shell is now ready for the real drama: the pour.
This technique is steeped in history, with roots stretching back over 2,000 years to at least the Han Dynasty (206 BC–220 AD). Molten bronze, heated to an astonishing 1100–1300°C, is poured into the hollow ceramic mold. As the fiery liquid metal cools and hardens, it takes on the exact shape of the long-gone wax model. You can learn more by exploring the detailed bronze sculpture process and its history.
The Major Phases of Creation
To really wrap your head around how a bronze statue is made, it’s helpful to see the journey broken down into its main stages. The process flows from the quiet, focused work of the artist’s studio to the intense, collaborative environment of the foundry, and finally back to the artist for the finishing touches.
The table below outlines the essential steps in this fascinating transformation.
Key Stages in the Bronze Statue Making Process
A summary of the primary phases involved in creating a bronze statue, from the artist's initial concept to the final finished artwork.
| Stage | Primary Activity | Purpose |
|---|---|---|
| Original Sculpting | The artist creates the master sculpture from clay or another medium. | To establish the final form, detail, and artistic vision of the piece. |
| Mold Making | A flexible rubber mold is created from the original, supported by a rigid mother mold. | To create a negative impression from which a perfect wax copy can be made. |
| Ceramic Shell Creation | The wax copy is dipped repeatedly in a ceramic slurry to build a hard shell. | To form a durable, heat-resistant mold that can withstand molten bronze. |
| Bronze Pouring | Molten bronze is poured into the hollow ceramic shell after the wax is melted out. | To cast the sculpture in its final, permanent metal form. |
| Finishing and Patination | The raw bronze is chased, welded, sanded, and treated with chemicals and heat. | To refine the surface, remove imperfections, and apply the final color and finish. |
Each step is absolutely critical. A mistake at any point can compromise the final piece, which is why the collaboration between artist and foundry is so essential.
Bringing the Vision to Life
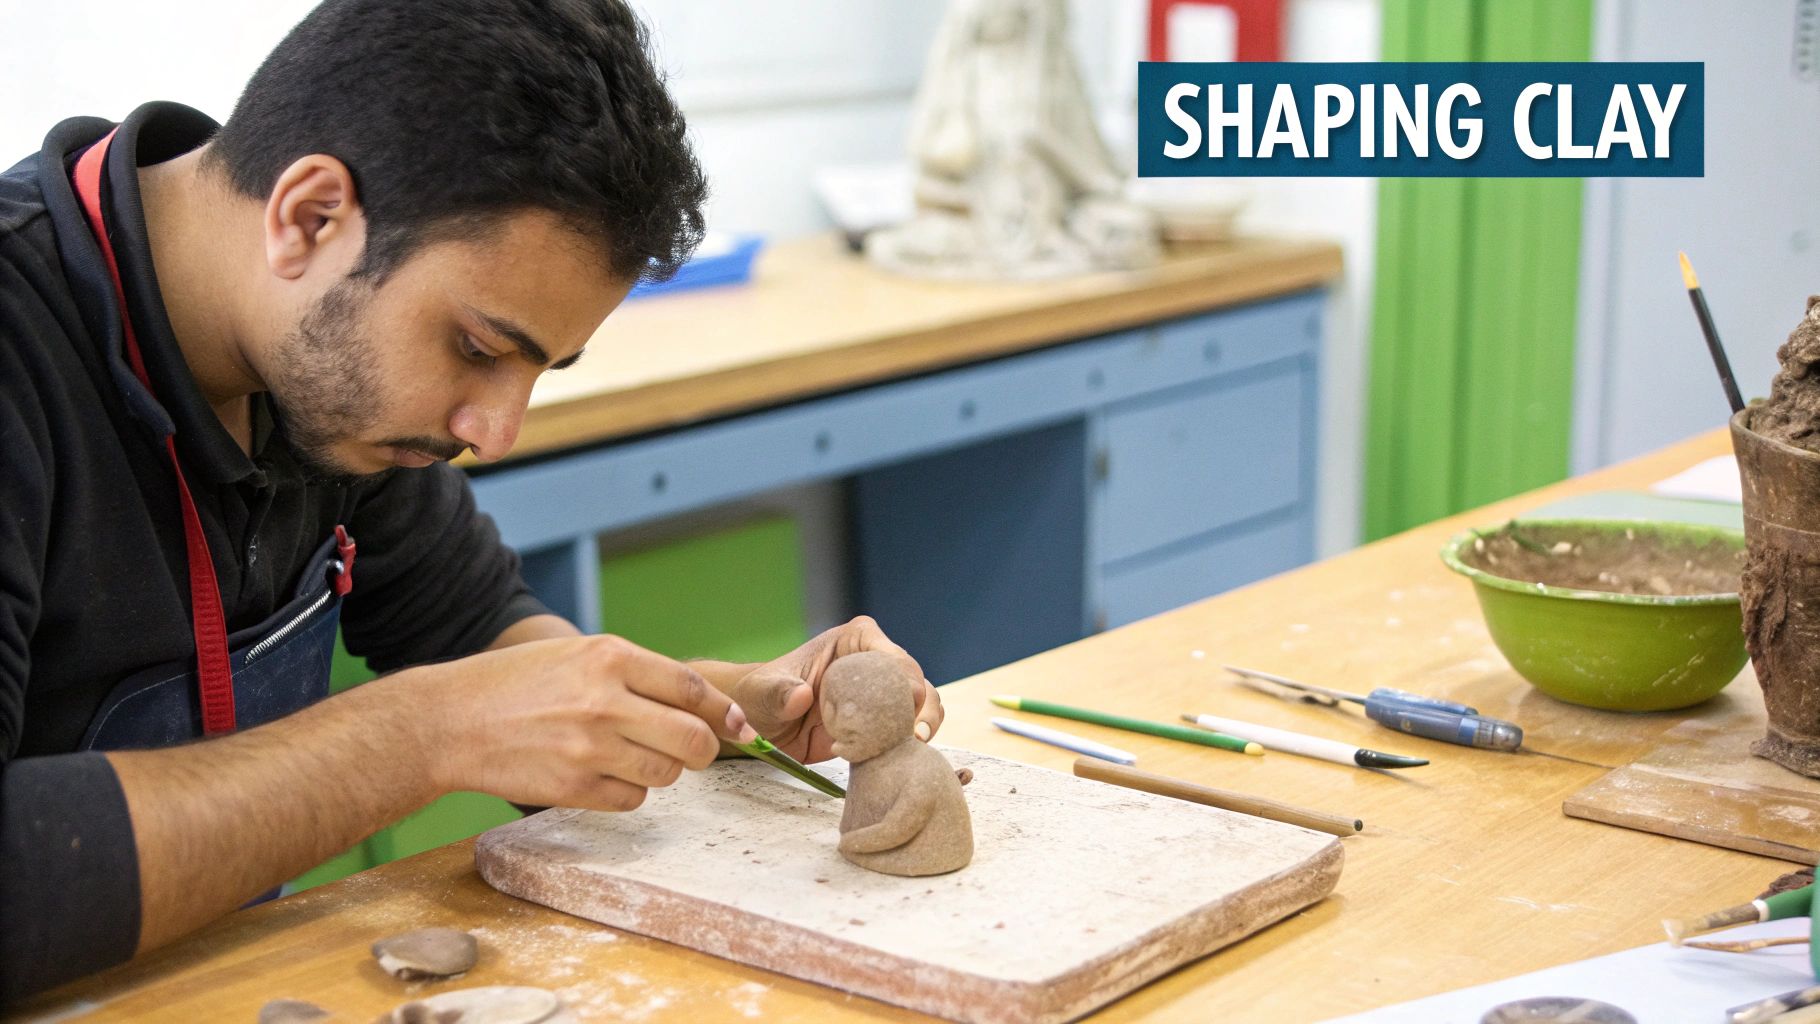
Before any metal gets melted, the life of a bronze statue starts quietly in the artist's studio. It all begins with the original sculpture—what we often call the "master" or the "positive." This is where the artist’s idea finally takes on a physical form, shaped by hand from something pliable.
The material choice here is everything. Many of us prefer oil-based clay simply because it doesn't dry out, giving us the freedom to work and rework a piece for weeks, even months. Others might reach for plaster or wax, each with its own feel and handling quirks. Every single detail has to be perfected at this stage, from the subtle curve of a muscle to the rough-hewn texture of a helmet. The final bronze will be an exact, and totally unforgiving, copy of this initial work.
Capturing Every Detail in a Flexible Mold
Once the artist is finally happy with the original sculpture, we can't just use it for casting. It's usually far too fragile and needs to be preserved. So, the next critical step is creating a negative mold that captures every last nuance of that master model. This is almost always done with a flexible material like silicone or polyurethane rubber.
It’s a methodical, careful process. The liquid rubber is painted or poured over the sculpture in several layers. I always start with a very fine brush for the first "print coat" to make sure the rubber gets into every tiny crevice. This prevents air bubbles that would absolutely ruin the surface of the final bronze. After that, you just build up thicker layers to give the mold its strength. This kind of hands-on technique has been refined over centuries, as you can see in our overview of art history periods and their timelines.
Here's something important to understand: this rubber mold is designed to be used more than once. It’s what allows an artist to create a limited edition of bronzes, with each one being a direct descendant of the original masterwork. Once the edition is complete, the mold is often destroyed to protect the collection's value.
The Mother Mold: A Rigid Support System
That flexible rubber mold is perfect for peeling away from the original sculpture without damaging it, but that same flexibility means it can't hold its own shape. To solve this, we build a rigid outer casing around it, known as the mother mold.
This is usually made from plaster or fiberglass and constructed in sections, almost like a clamshell. We create keys and seams so it can be taken apart and put back together perfectly every time. Think of it as a skeleton for the soft rubber, making sure the interior maintains the exact form of the original sculpture for the next steps.
Once the mother mold is finished, we can carefully disassemble it and peel the flexible rubber mold away from the clay master. The original sculpture is now safe, and we're left with a perfect negative impression, ready for the next stage of the process.
Creating the Perfect Wax Replica
With our negative mold ready, it's time to create the piece that will ultimately be "lost" during casting: the wax copy. And this isn't just any old wax; it's a specialized casting wax formulated to melt cleanly and pick up the finest details.
Hot, liquid wax gets poured into the rubber mold and sloshed around to coat all the interior surfaces. The goal isn't to make a solid wax figure, but a hollow one. Why hollow?
- Weight: A solid bronze statue would be unbelievably heavy and a nightmare to move or install.
- Cost: Bronze is an expensive alloy. A hollow cast uses far less material, making the final piece more affordable.
- Stability: Large, solid chunks of metal are notorious for cracking and shrinking unevenly as they cool. A hollow piece with a consistent wall thickness cools down much more evenly, giving you a stronger, more stable sculpture in the end.
An experienced artisan controls the thickness of the wax walls with incredible precision, usually aiming for around 3/16 of an inch (about 5 mm). They pour out the excess wax after each layer has cooled a bit, repeating the process until the walls are just right. What you're left with is a perfect, but temporary, hollow wax replica of the original sculpture, ready to begin its journey into bronze.
Building the Ceramic Shell for Casting
With a perfect wax replica in hand, the action shifts from the artist's studio to the foundry floor. This is where the art meets some pretty intense industrial science. Your delicate wax figure, holding every nuance of the original sculpture, is about to get a suit of armor strong enough to contain molten metal.
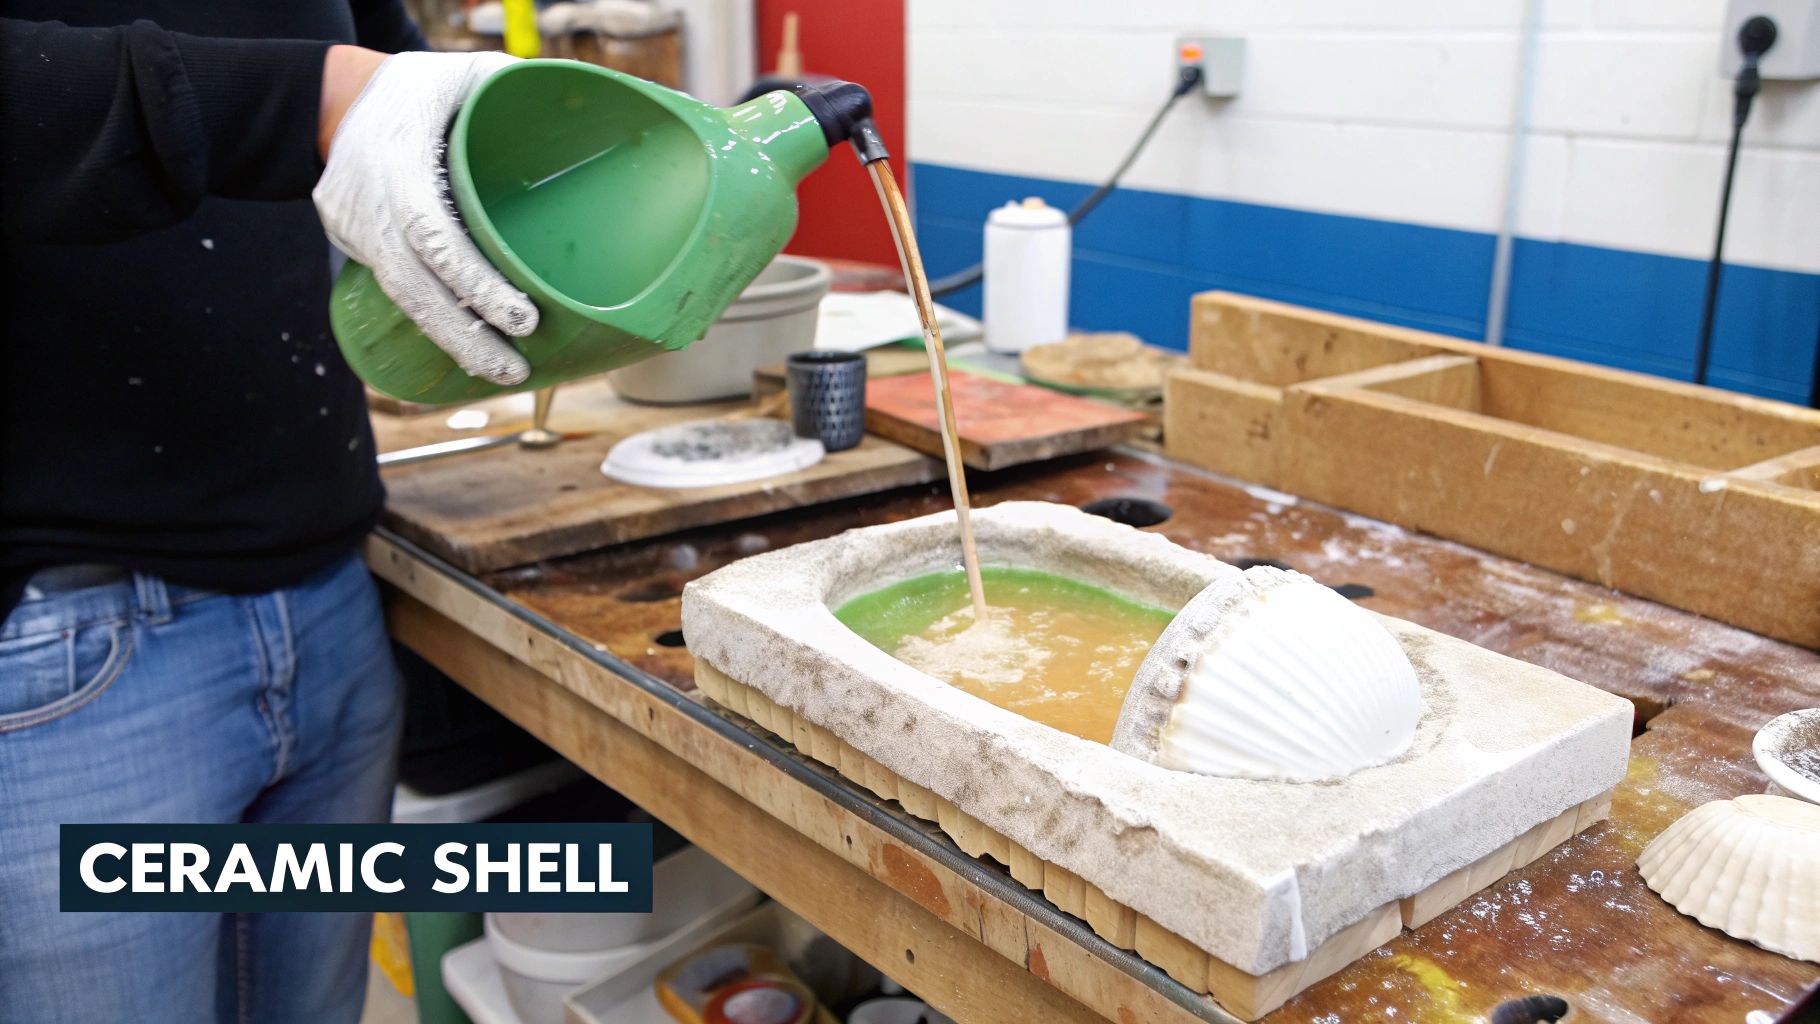
This whole stage is known as investment casting. It kicks off by dipping the entire wax model into a vat of ceramic slurry—think of it as a high-tech liquid clay made of fine silica and other specialized materials.
Right after its dip, the wet, slurry-coated wax is dusted with a very fine, sand-like ceramic stucco. This first coat is everything. It’s the one that will touch the bronze, so it has to capture every single detail flawlessly. The coated wax is then set aside to dry completely.
Layering Up for Strength
A single ceramic layer isn't going to cut it against the heat and pressure of molten bronze—not even close. So, you repeat the process. Dip, stucco, dry. Over and over again.
With each new layer, the ceramic stucco gets a little coarser. This strategy builds up the shell’s thickness and strength much faster than just using the fine stuff. A typical shell for a statue might need anywhere from 7 to 12 layers, all depending on how big and complex the piece is.
Building these layers can easily take several days, sometimes more than a week. You absolutely cannot rush the drying time. Trapped moisture is your enemy; it can cause the shell to crack or even explode when the hot bronze hits it. Patience isn't just a virtue here; it's a critical safety measure.
The real trick is to build a shell that's porous enough for gases to escape during the pour, but strong enough to survive the thermal shock. It's a delicate balance that foundry artisans learn from years of hands-on experience.
The Burnout: The "Lost" in Lost-Wax Casting
Once the final layer is bone dry, the ceramic-encased wax is ready for the most dramatic moment in the whole process: the burnout. The entire shell is placed upside down in a massive, high-temperature oven, or kiln.
As the kiln heats up, two essential things happen.
First, the wax inside melts and pours out through the channels we attached earlier. This is the "lost-wax" part of the name, leaving a perfectly hollow cavity that is an exact negative of your sculpture.
Second, the intense heat fires the ceramic itself, vitrifying it into a rock-hard mold that can handle the insane temperatures of liquid metal. To give you some perspective, molten bronze is poured at temperatures between 1050°C and 1300°C. The specialized ceramic shell is engineered specifically to withstand that kind of thermal assault. You can dig deeper into the manufacturing process of bronze statues to see just how crucial these materials are.
The burnout is a slow, controlled burn, often lasting several days to ensure every last bit of wax and moisture is vaporized. What comes out of the kiln is a hollow, hardened ceramic shell—a perfect vessel, now ready to receive the molten bronze that will give the sculpture its final, permanent form.
The Heart of the Process: The Bronze Pour
This is the moment. All the meticulous prep work, the long hours of sculpting, molding, and waxing—it all comes down to these next few intense, fiery minutes. The bronze pour is the dramatic climax of the whole affair, where the sculpture is finally born in metal.
It all starts by loading solid bronze ingots into a crucible. These aren't just any metal bricks; they're a precise alloy, usually 88% copper and 12% tin. The crucible, a heavy-duty ceramic pot, is then placed inside a furnace that roars to life, climbing to temperatures over 1100°C (2000°F). The solid metal slowly succumbs to the blistering heat, transforming into a glowing, molten liquid.
This liquid state is precisely why bronze is such an incredible medium for sculpture. It has the ability to flow into the most delicate and complex details of the ceramic shell, capturing every single nuance the artist painstakingly created.
Gearing Up for the Pour
While the bronze is melting, the foundry team is busy making final preparations. The hollow ceramic shells, pulled directly from the burnout kiln, are still incredibly hot. And that’s by design. If you were to pour molten metal into a cold mold, the thermal shock would likely crack the shell, and the bronze would cool too fast to fill the entire cavity.
The team carefully arranges the hot shells in a sandpit, which provides essential support against the immense weight and pressure of the liquid metal about to flood into them. It’s a scene of focused, coordinated action on the foundry floor.
A successful pour is all about flow. The goal is to fill the mold quickly and evenly in a single, continuous stream. Any hesitation or interruption can create weak spots or "cold shuts," where the metal cools and solidifies before properly fusing, ruining the cast.
The Hidden Engineering of a Perfect Cast
It’s not as simple as just dumping metal into a hole. Remember those wax rods we attached to the model earlier? They melted out during the burnout, leaving behind a complex network of channels—an internal plumbing system, really.
This system is what makes a successful cast possible and has a few key parts:
- Sprues: Think of these as the main funnels that guide the molten bronze from the crucible into the mold.
- Gates: These are smaller channels branching off the sprues, controlling how the metal flows into specific parts of the sculpture.
- Vents: These thin channels are absolutely critical. They run from the highest points of the mold to the outside, allowing hot gases and displaced air to escape as the bronze rushes in.
Without good venting, you'd get trapped air pockets, leaving voids and imperfections in the final piece. This hidden engineering is the secret to a flawless casting.
The Pour Itself
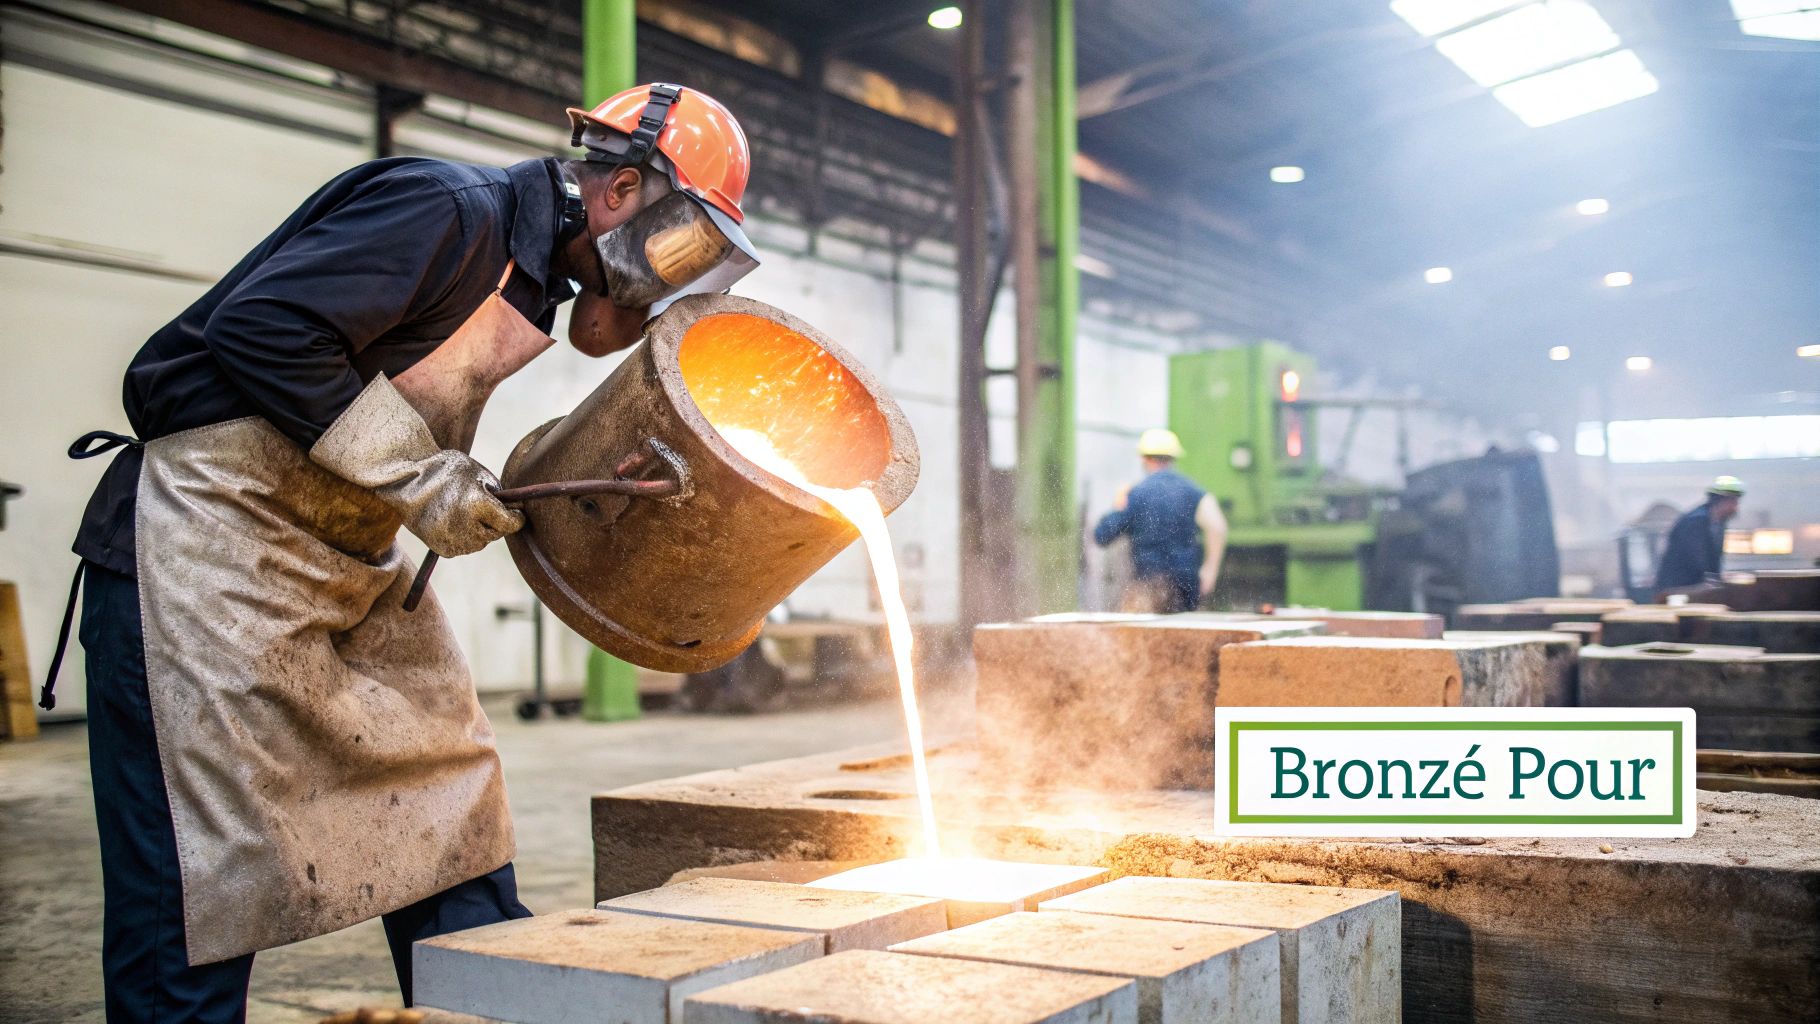
Once the bronze hits the perfect temperature, the real show begins. The foundry workers, clad head-to-toe in aluminized suits, heavy gloves, and face shields, move with a practiced rhythm. Using a hoist, they lift the white-hot crucible from the furnace.
The team carries the crucible over to the waiting shells. With steady hands and incredible control, they tip the vessel, and a brilliant river of liquid fire pours into the mold's opening. It’s a fast, intense, and surprisingly quiet process, broken only by the focused commands of the team leader. They fill one mold, then move swiftly to the next until all the bronze has been poured.
Now, the glowing shells just sit in the sand as the metal inside begins its slow journey back to a solid state. This cooling process can't be rushed; cooling too quickly can create stress fractures. Depending on the size of the piece, it can take several hours—or even overnight—for the bronze to cool completely and solidify into its final, permanent form.
Revealing and Refining the Final Sculpture
After the intense heat of the bronze pour and the long, patient wait for it to cool, the sculpture is still a hidden secret. It’s trapped inside a rock-hard ceramic shell, and this is the moment of truth where all the hard work either pays off or reveals a costly mistake.
Breaking the statue free is a process called divestment. It’s loud, it’s dusty, and it’s pure physical labor. Foundry workers attack the ceramic shell with hammers and pneumatic chisels, carefully cracking it away piece by piece. You have to use just enough force to shatter the shell without damaging the fresh bronze underneath—it’s a true blend of brute force and a delicate touch.
Once most of the ceramic is off, the statue gets moved into a sandblasting cabinet. A high-pressure stream of fine sand scours away every last speck of shell, especially from the deep textures and fine details. When it emerges, you see the statue in its raw metal form for the very first time. It's a rough, unfinished piece, covered in a network of metal rods and channels.
The Meticulous Art of Chasing
What comes out of the sandblaster is far from the finished product. This is a raw casting, complete with the sprues and vents that acted as the bronze's plumbing during the pour. Now, all of that extra metal has to be painstakingly removed.
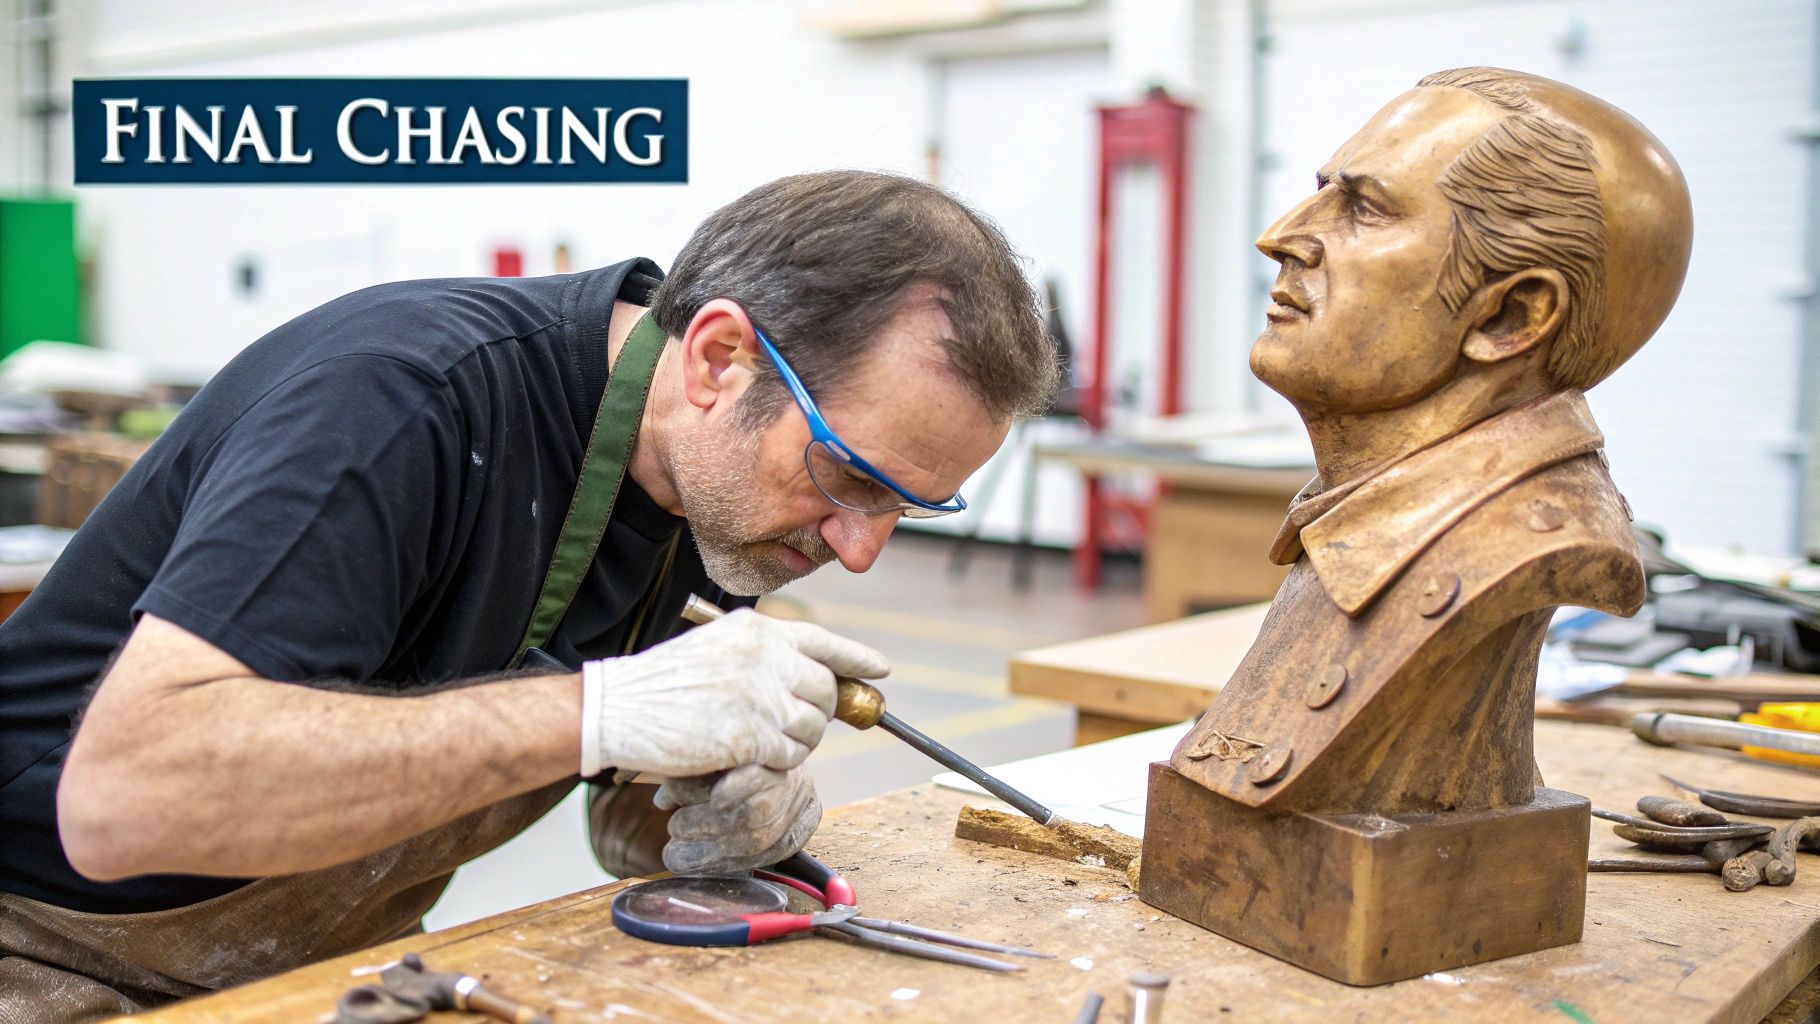
This is a highly skilled job known as chasing.
The artisans, or "chasers," use an arsenal of saws, grinders, and cutting tools to carefully remove the metal plumbing. The real art, though, is in erasing any evidence it was ever there. This means grinding down weld marks, smoothing seams, and re-texturing the surface to perfectly match the artist's original sculpture. If the artist wanted a rough, hand-worked texture, the chaser uses tiny hammers and chisels to replicate it. If it was smooth, they sand and polish it to a mirror finish.
This is where the foundry's craftsmanship truly shines. A great chaser makes every seam and repair completely invisible, ensuring the final bronze is a seamless work of art that’s absolutely true to the artist's original vision.
This skill is especially crucial for larger works. A monumental statue, sometimes several meters tall, is almost never cast in one go. The risks are just too high. Instead, it's cast in multiple sections, and each piece goes through the entire lost-wax process on its own. Skilled welders then assemble the puzzle. After assembly, the seams are chased and blended so perfectly you’d never know it wasn’t a single piece. You can learn more about how bronze casting has developed through time to handle these massive projects.
Patination: Giving the Bronze Its Soul
A freshly chased bronze statue doesn't have that classic, dark look we all recognize. It’s actually a bright, shiny gold color, almost like a new penny. Getting that iconic finish requires one final, crucial step: patination.
Patination is the process of applying chemicals and heat to create the sculpture's final color. A patina is essentially a controlled layer of oxidation on the metal's surface. Far from being damage, this layer actually protects the bronze from uncontrolled corrosion—like the green you see on the Statue of Liberty. It’s also an incredibly artistic process that adds depth, character, and emotion to the piece.
The patina artist becomes a painter, but their canvas is hot metal and their paints are chemicals. Using a torch, they heat sections of the bronze and then apply different solutions with brushes, spray bottles, or sponges. The heat triggers an instant chemical reaction, creating a burst of color right on the surface. It's a delicate dance of heat and chemistry; a few degrees too hot or a slightly different chemical mix can completely change the outcome.
To get you a better sense of how this works, here's a look at some common chemicals and the colors they produce.
Common Patina Chemicals and Their Color Effects
This table provides a look at the chemicals used in patination and the colors they typically produce on a bronze surface when applied with heat.
| Chemical Compound | Typical Color Result | Application Notes |
|---|---|---|
| Ferric Nitrate | Reds, Oranges, Browns | A very common choice for warm, earthy tones. The color deepens with more applications. |
| Cupric Nitrate | Greens, Blues | Often used to create the classic "verdigris" green. Can be applied hot or cold. |
| Liver of Sulfur | Blacks, Dark Browns, Purples | Creates a fast-acting dark patina. Excellent for creating deep shadows and contrast. |
| Bismuth Nitrate | Pearly Whites, Light Grays | A specialty chemical used for creating opaque white and grey effects, often layered. |
The artist builds up these colors in thin, translucent layers, much like a watercolor painter. This allows for subtle shading and rich, complex finishes that give each sculpture its own unique personality. Once the coloring is complete, a final coat of protective wax is applied to the warm statue. This seals the patina, deepens the colors, and gives the bronze its final lustrous sheen.
The sculpture is now, finally, complete—transformed from an idea into a timeless work of art. To keep it looking its best, our guide on how to clean a bronze statue offers tips for preserving this delicate finish for generations.
Common Questions About Making Bronze Statues
After walking through the entire process—from a sculptor's clay model to a finished bronze masterpiece—it’s natural to have a few practical questions pop up. Whether you're a seasoned collector, an artist just starting out, or simply fascinated by the craft, digging into these details can really deepen your appreciation for the art.
Let's tackle some of the most common questions I hear about the realities of bronze sculpture.
Why Are Bronze Statues So Expensive?
The price of a bronze statue isn't arbitrary; it’s a direct reflection of three major cost drivers.
First, the raw materials aren't cheap. Bronze is an alloy, mostly copper with a bit of tin, and the prices for these metals are constantly shifting on the commodities market. A life-sized figure can easily require hundreds of pounds of this expensive metal.
Next is the incredible amount of skilled labor involved. Creating a bronze isn't a one-person show. It’s a true collaboration between a whole team of artisans: the mold-maker, the wax-chaser, the foundry crew handling the dangerous pour, the metal-chasers who refine the raw casting, and the patina artist who brings the surface to life. Each step requires years of experience and countless hours of hands-on work.
Finally, you have the massive overhead of the foundry itself. The energy needed to run high-temperature furnaces and kilns is immense, not to mention the cost of maintaining all that specialized equipment. When you invest in a bronze statue, you're paying for all that accumulated time, skill, and infrastructure.
Are Most Bronze Statues Hollow?
Yes, almost all of them are. It might seem like a solid bronze would be more valuable, but casting hollow is the superior method for a few critical reasons.
For one thing, a large, solid bronze statue would be unbelievably heavy, making it a nightmare to move and install. It would also be prohibitively expensive because of the sheer volume of metal needed. Hollow casting is simply a much more practical and efficient use of materials.
There's also a crucial technical reason. As a large, solid chunk of metal cools, the outside shrinks faster than the molten core. This creates tremendous internal stress that can easily lead to cracks and structural failure. A hollow cast, on the other hand, usually has a uniform wall thickness of around 3/16 of an inch, allowing it to cool evenly and create a much stronger, more stable final piece.
The lost-wax process is perfectly designed for this. An artist or foundry artisan can control the thickness of the wax model's walls with precision, and that wax thickness is exactly what determines the thickness of the final bronze.
How Long Does a Bronze Statue Last?
Bronze is one of the most durable materials on earth. With just a little care, a bronze statue will easily last for thousands of years. Just look at the ancient bronze artifacts that archaeologists unearth in stunning condition after centuries underground.
When bronze is left outside, it doesn't rust and flake away like iron. Instead, it develops a patina—a thin layer of oxidation that forms on the surface. This is what gives the Statue of Liberty its famous green color.
This patina isn't a sign of decay; it’s actually a protective shield that seals the underlying metal from further corrosion. A bronze sculpture is essentially a permanent work of art, built to outlast us all.
What Is a Limited Edition Bronze Sculpture?
When a sculpture is part of a "limited edition," it means the artist has made a commitment to cast only a specific, fixed number of them from a single mold. For example, if you see a piece marked "5/15," you know it's the fifth cast from a total run of just fifteen.
Once the last piece in the edition is cast, the mold is supposed to be destroyed. This guarantees that no more official copies will ever be made, which creates scarcity and preserves the value of the collection for collectors.
The alternative is an "open edition," where there's no set limit, and the artist can produce as many as they want. These are typically more affordable but less valuable to serious art collectors. You can often find this information stamped directly on the statue itself, and our guide to understanding bronze foundry marks is a great resource for learning how to decipher them.
Have you ever found a beautiful bronze piece at a thrift store or inherited one from family and wondered about its story and value? With Curio, you can uncover the history behind your treasures. Just snap a photo, and our app provides instant identification, historical context, and an expert appraisal. Download Curio today and let your antiques tell their story. Learn more at https://www.curio.app.